摇杆
来自Labplus盛思维基百科

概述
具有(X,Y)2轴模拟输出,可以制作遥控器用于控制运动物体的方向、速度等互动作品
技术参数
- 工作电压: VCC 3.3V -5V
- 模拟输出:0-VCC
- 模块尺寸:24x46x7.5mm
引脚定义
| VCC | 电源 |
| A1 | X轴模拟量 |
| A0 | Y轴模拟量 |
| GND | 地 |
使用教程
掌控板及mPython编程
#程序功能:用摇杆进行上下左右操控时,掌控板OLED屏显示对应的方向箭头。
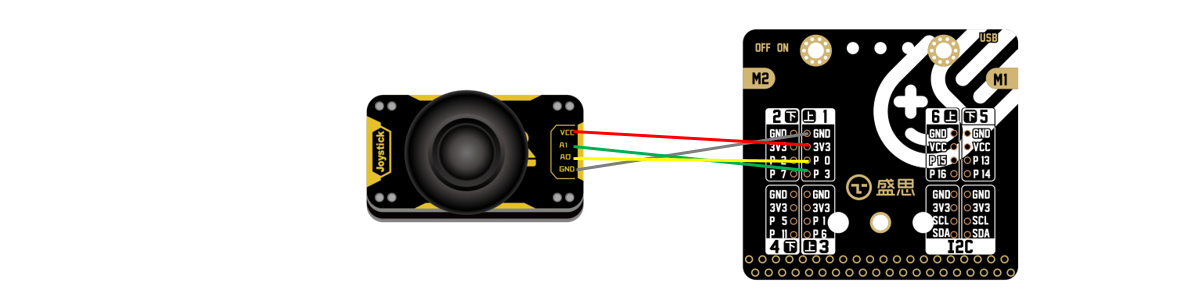 |
| 连接示意图 |
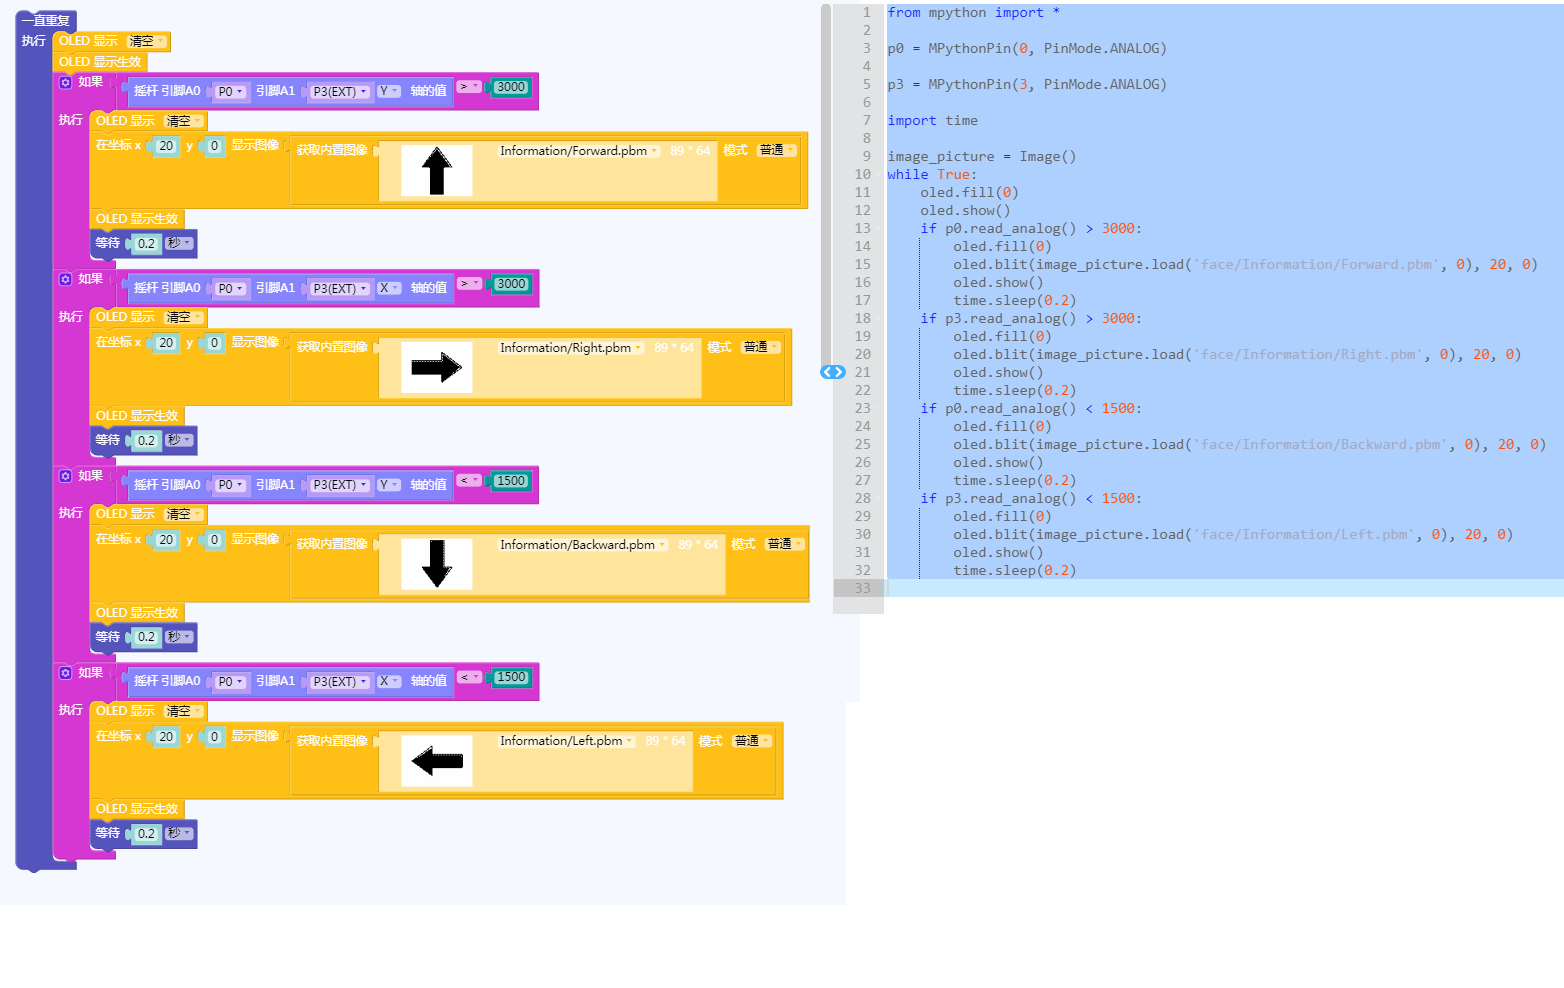 |
| 图形化及mPython代码 |
Arduino示例
//程序功能:根据遥感不同的值来分别控制两个LED灯的亮灭//
int analogAPin =A0;
int analogBPin =A1;
int ledredPin =2;
int ledbluePin =3;
int a,b;
void setup() {
  Serial.begin(9600);
  pinMode(analogAPin, INPUT);
  pinMode(analogBPin, INPUT);
  pinMode(ledredPin, OUTPUT);
  pinMode(ledbluePin,OUTPUT);
}

void loop() {
  a=analogRead(analogAPin);
  b=analogRead(analogBPin);
  Serial.println(a);
  if(a>600)
  {
     digitalWrite(ledredPin,HIGH);
  }
  else
  {
     digitalWrite(ledredPin,LOW);
  }
  if(b>600)
  {
     digitalWrite(ledbluePin,HIGH);
  }
  else
  {
     digitalWrite(ledbluePin,LOW);
  }

}
Bluebit主控
摇杆模块连接P0、P1引脚,数码管连接至I2C接口。将摇杆x轴采样值显示至数码管。
_TubeTab = [
    0x3F, 0x06, 0x5B, 0x4F, 0x66, 0x6D, 0x7D, 0x07, 0x7F,
    0x6F, 0x77, 0x7C, 0x39, 0x5E, 0x79, 0x71, 0x00, 0x40]

def tm1650Init():
  i2c.write(0x24, bytearray([0x01]))
def tm1650DisplayUint(x):
  charTemp = [0, 0, 0, 0]
  x = (x if x < 10000 else 9999)
  charTemp[3] = x%10
  charTemp[2] = (x//10)%10
  charTemp[1] = (x//100)%10
  charTemp[0] = (x//1000)%10
  if x < 1000:
    charTemp[0] = 0x10
    if x < 100:
      charTemp[1] = 0x10
      if x < 10:
        charTemp[2] = 0x10
  for i in range(0, 4):
    i2c.write(0x34+i, bytearray([_TubeTab[charTemp[i]]]))
def tm1650DisplayInt(x):
  x = round(x)
  if x >= 0:
    tm1650DisplayUint(x)
  else:
    temp = (x if x > -999 else -999)
    temp = abs(temp)
    tm1650DisplayUint(temp)
    if temp < 10:
      i2c.write(0x36, bytearray([_TubeTab[0x11]]))
    elif temp < 100:
      i2c.write(0x35, bytearray([_TubeTab[0x11]]))
    elif temp < 1000:
      i2c.write(0x34, bytearray([_TubeTab[0x11]]))

def tm1650Clear():
    for i in range(0, 4):
        i2c.write(0x34+i, bytearray([TubeTab[0x10]]))
tm1650Init()
while True:
  tm1650DisplayInt(pin1.read_analog())
  sleep(10)
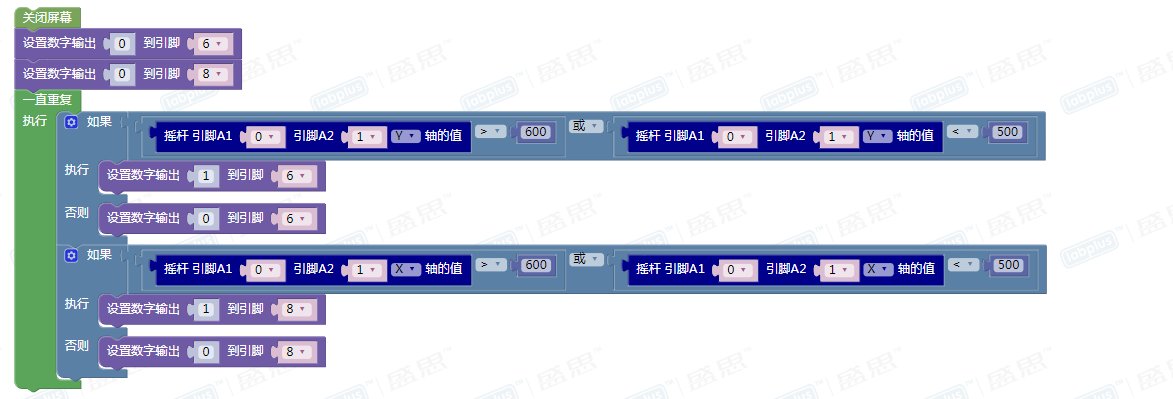
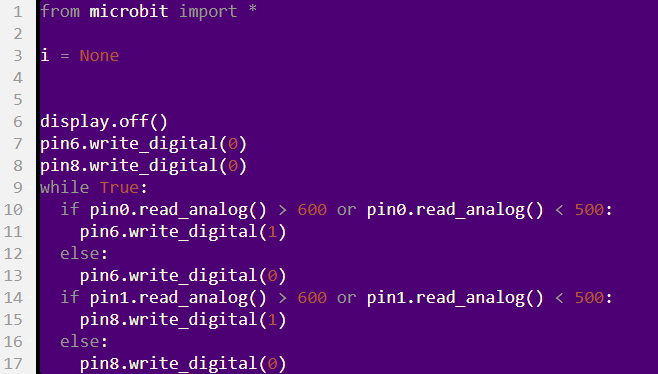
图形化示例
| 程序功能:摇杆在X轴上摇,LED灯1亮;摇杆在Y轴上摇,LED灯2亮 | |
 |
 |
版本历史记录
| Version | Date | Note [+]新增[-]删除[^]修复 |
|---|---|---|
| V2.0 |