斜不胜正灯
来自Labplus盛思维基百科
概述
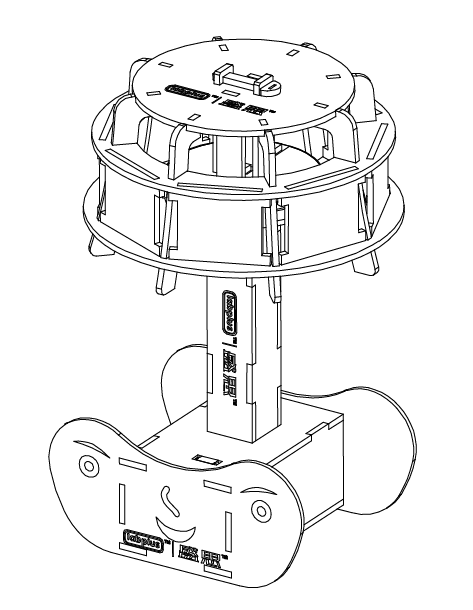
本作品可通过触发倾斜传感器改变彩色RGB灯带颜色。使用时先根据制作说明将作品组装完整,然后接上 电源(9V电池或USB供电),打开主控板开关,触发倾斜传感器即可。本作品用倾斜传感器作为输入装置, 彩色RGB灯带作为输出装置,可自行编程改变颜色、变换方式、灯带数量等。DIY动手组装,锻炼动手能 力,了解智能创意电子套件的使用,激发创新思维,增加学习乐趣。
使用教程
将灯倾斜触发后,程序控制17颗灯珠渐变颜色。灯回正后,灯带停止渐变颜色。
组装说明
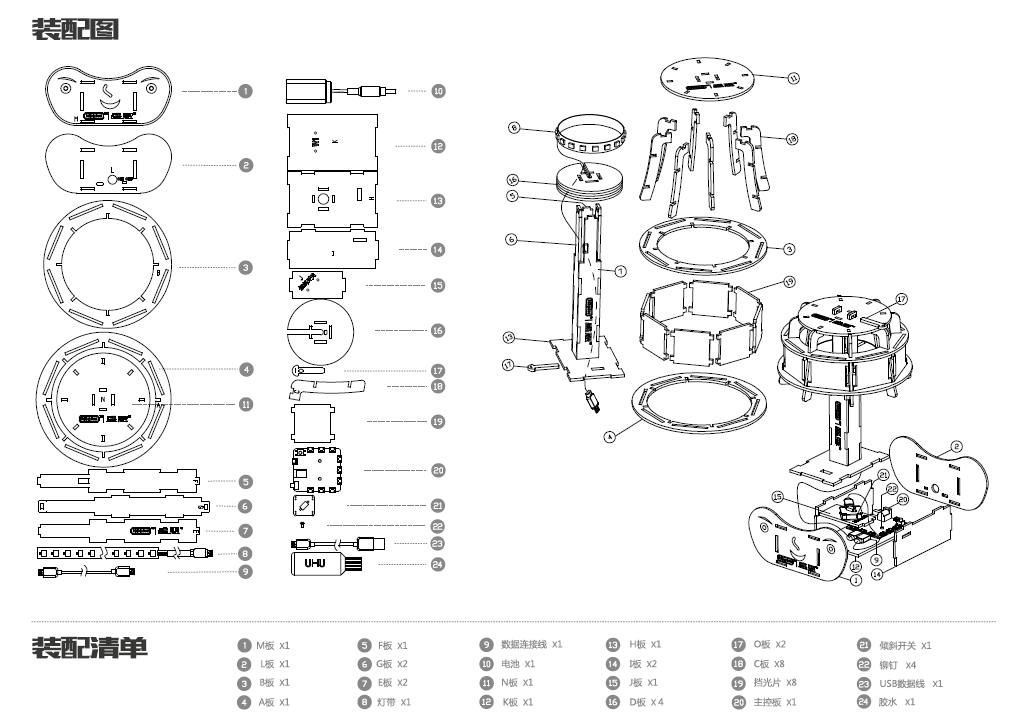
电子模块清单
| 模块名称 | 数量 |
|---|---|
| W1控制板 | x1 |
| 倾斜开关 | x1 |
| RGB灯带(17颗) | x1 |
电子模块连接说明
| 模块 | 引脚 | 说明 |
|---|---|---|
| 倾斜开关 | W1-9/10接口 | |
| RGB灯带(17颗) | W1-7/8接口 |
Arduino程序/图形化程序
| 斜不胜正灯程序包 |
#include "Adafruit_NeoPixel.h"


#define SWITCHPIN  9

int numpixelsPin = 7;
#define nusec  5
#define NUMPIXELS   20

int num;
uint8_t r,g,b;
uint16_t h;

int led = 20;

int fz=0;
int flag=0;
int flag1=0;

int i = 0;
uint16_t cnt = 0;
Adafruit_NeoPixel pixels1 = Adafruit_NeoPixel(NUMPIXELS, numpixelsPin, NEO_GRB + NEO_KHZ800);

void HSV2RGB(uint16_t h, float s, float v, uint8_t * r, uint8_t * g, uint8_t *b);

void setup()
{
  pinMode(numpixelsPin,OUTPUT);
  pinMode(SWITCHPIN,INPUT);
  digitalWrite(numpixelsPin,LOW);
  pinMode(nusec,OUTPUT);
  digitalWrite(nusec,HIGH);
  // put your setup code here, to run once:
  pixels1.begin(); // This initializes the NeoPixel library.
  for(num = 0; num < led; num++)
  {
    pixels1.setPixelColor(num, pixels1.Color(0,0,0)); // Moderately bright green color.
  }
  pixels1.show(); // This sends the updated pixel color to the hardware
  for(num = 0; num < led; num++)
  {
    pixels1.setPixelColor(num, pixels1.Color(128,0,0)); // Moderately bright green color.
    pixels1.show(); // This sends the updated pixel color to the hardware
    delay(65);
  }
  for(num = (led-1); num >= 0; num--)
  {
    pixels1.setPixelColor(num, pixels1.Color(0,128,0)); // Moderately bright green color.
    pixels1.show(); // This sends the updated pixel color to the hardware
    delay(65);
  }
  for(num = 0; num < led; num++)
  {
    pixels1.setPixelColor(num, pixels1.Color(0,0,128)); // Moderately bright green color.
    pixels1.show(); // This sends the updated pixel color to the hardware
    delay(65);
  }
//  Serial.begin(115200);
}

void loop()
{
  if(digitalRead(SWITCHPIN))
  {
      h += 2;
      if(h>360)
      {
        h=0;
      }
       HSV2RGB(h, 1.0, 1.0, &r, &g, &b);

        for(num = 0; num < led; num++)
        {
          pixels1.setPixelColor(num, pixels1.Color(r,g,b)); // Moderately bright green color.
        }
        pixels1.show(); // This sends the updated pixel color to the hardware

        digitalWrite(nusec,LOW);     //ying yue
        delay(50);
   }
   else
   {
      for(num = 0; num < led; num++)
      {
        pixels1.setPixelColor(num, pixels1.Color(r,g,b)); // Moderately bright green color.
      }
      pixels1.show(); // This sends the updated pixel color to the hardware
      digitalWrite(nusec,HIGH);    //ying yue
      delay(50);
  }
}

void HSV2RGB(uint16_t h, float s, float v, uint8_t * r, uint8_t * g, uint8_t *b)
{
  uint8_t hi;
  float f, p, q, t;
  hi = (uint8_t)(h / 60);
  f = (float)h/60 - hi;
  p = v * (1 - s);
  q = v * (1 - f * s);
  t = v * (1 - (1 - f) * s);
  switch(hi)
  {
    //0: {r,g,b} = {v,t,p}
    case 0:
      *r = v * 255;
      *g = t * 255;
      *b = p * 255;
      break;
    //1: {r,g,b} = {q,v,p}
    case 1:
      *r = q * 255;
      *g = v * 255;
      *b = p * 255;
      break;
    //2: {r,g,b} = {p,v,t}
    case 2:
      *r = p * 255;
      *g = v * 255;
      *b = t * 255;
      break;
    //3: {r,g,b} = {p,q,v}
    case 3:
      *r = p * 255;
      *g = q * 255;
      *b = v *255;
      break;
    //4: {r,g,b} = {t,p,v}
    case 4:
      *r = t * 255;
      *g = p * 255;
      *b = v * 255;
      break;
    //5: {r,g,b} = {v,p,q}
    case 5:
      *r = v * 255;
      *g = p * 255;
      *b = q * 255;
      break;
    default:
      break;
  }
}
FAQ
版本历史记录
| Version | Date | 新增/删除/修复 |
|---|---|---|