“循迹”的版本间的差异
来自Labplus盛思维基百科
Labplus课程组(讨论 | 贡献) (→图形化示例) |
(→使用教程) |
||
| (未显示2个用户的10个中间版本) | |||
| 第16行: | 第16行: | ||
| <small>VCC</small> || <small>电源</small> | | <small>VCC</small> || <small>电源</small> | ||
|- | |- | ||
| − | | <small> | + | | <small>D2</small> || <small>D2红外接收触发值</small> |
|- | |- | ||
| − | | <small> | + | | <small>D1</small> || <small>D1红外接收触发值</small> |
|- | |- | ||
| <small>GND</small> || <small>地</small> | | <small>GND</small> || <small>地</small> | ||
| 第24行: | 第24行: | ||
== 使用教程 == | == 使用教程 == | ||
| − | + | 1、在安装循迹模块时约距离循迹线1CM左右;<br/> | |
| − | === < | + | 2、循迹线的宽度至少15mm;<br/> |
| + | 3、可用黑色电工胶带DIY循迹线,效果较好。<br/> | ||
| + | |||
| + | === <font size="3">掌控板及mPython编程</font> === | ||
| + | |||
| + | <pre style="color:blue"> | ||
| + | #程序功能:用循迹传感器加上2个电机,制作一个循迹小车。 | ||
| + | </pre> | ||
| + | {| | ||
| + | |- | ||
| + | | [[文件:循迹接线图.png |800px|居中|无框]] | ||
| + | |- | ||
| + | |style="text-align:center"|连接示意图 | ||
| + | |} | ||
| + | <br/> | ||
| + | |||
| + | {| | ||
| + | |- | ||
| + | | [[文件:循迹mPython编程.png |900px|居中|无框]] | ||
| + | |- | ||
| + | |style="text-align:center"|图形化及mPython代码 | ||
| + | |} | ||
| + | <br/> | ||
| + | <br/> | ||
| + | === <font size="3">Bluebit主控</font> === | ||
<pre style="color:blue"> | <pre style="color:blue"> | ||
//程序功能:根据循迹传感器两个红外对管的不同状态,控制两个电机的状态// | //程序功能:根据循迹传感器两个红外对管的不同状态,控制两个电机的状态// | ||
| 第33行: | 第57行: | ||
// 0 1 转 不转 // | // 0 1 转 不转 // | ||
// 0 0 转 转 // | // 0 0 转 转 // | ||
| − | + | from microbit import * | |
| − | + | ||
| − | + | D1 = None | |
| − | + | D2 = None | |
| − | + | ||
| − | + | def digitalRead(pin): | |
| − | + | pin.read_digital() | |
| − | + | pin.set_pull(pin.NO_PULL) | |
| − | + | return pin.read_digital() | |
| − | + | ||
| − | + | ||
| − | + | while True: | |
| + | D1 = digitalRead(pin10) | ||
| + | D2 = digitalRead(pin4) | ||
| + | if D1 == 1 and D2 == 0: | ||
| + | pin14.write_analog(1) | ||
| + | sleep(2) | ||
| + | pin13.write_analog(1) | ||
| + | sleep(2) | ||
| + | pin16.write_analog(500) | ||
| + | sleep(2) | ||
| + | pin15.write_analog(1) | ||
| + | sleep(2) | ||
| + | elif D1 == 0 and D2 == 1: | ||
| + | pin16.write_analog(1) | ||
| + | sleep(2) | ||
| + | pin15.write_analog(1) | ||
| + | sleep(2) | ||
| + | pin13.write_analog(500) | ||
| + | sleep(2) | ||
| + | pin14.write_analog(1) | ||
| + | sleep(2) | ||
| + | else: | ||
| + | pin13.write_analog(500) | ||
| + | sleep(2) | ||
| + | pin14.write_analog(1) | ||
| + | sleep(2) | ||
| + | pin16.write_analog(500) | ||
| + | sleep(2) | ||
| + | pin15.write_analog(1) | ||
| + | sleep(2) | ||
| − | |||
| − | |||
| − | |||
| − | |||
| − | |||
| − | |||
| − | |||
| − | |||
| − | |||
| − | |||
| − | |||
| − | |||
| − | |||
| − | |||
| − | |||
| − | |||
| − | |||
| − | |||
| − | |||
| − | |||
| − | |||
| − | |||
| − | |||
| − | |||
| − | |||
| − | |||
| − | |||
</pre> | </pre> | ||
| − | ===< | + | ===<font size="3">图形化示例</font>=== |
| − | + | {| | |
| − | : | + | |- |
| + | |连接如下图所示: | ||
| + | |- | ||
| + | |[[文件:循迹小车 1.png|500px|center|无框]] | ||
|- | |- | ||
| − | |||
| − | |||
|} | |} | ||
| − | + | <br/> | |
| − | + | {| | |
| − | : | + | |- |
| + | |程序功能:小车按照路线行驶 | ||
| + | |- | ||
| + | |[[文件:循迹小车图形化.png|600px|center|无框]] | ||
|- | |- | ||
| − | |||
| − | |||
|} | |} | ||
| − | |||
| − | |||
== 版本历史记录 == | == 版本历史记录 == | ||
| 第98行: | 第124行: | ||
!width="10%"|Version !!width="15%"| Date !! Note <small>[+]新增[-]删除[^]修复</small> | !width="10%"|Version !!width="15%"| Date !! Note <small>[+]新增[-]删除[^]修复</small> | ||
|- | |- | ||
| − | | V2.0 || || style="text-align:left"| | + | | V2.0 ||2018/08/09 || style="text-align:left"|[^]英文丝印;D1、D2交换 |
|} | |} | ||
2020年4月16日 (四) 14:00的最新版本
概述
可用于循迹线检测,当检测到黑色时,输出高电平,检测白色时,输出低电平。
基于红外反射原理,红外发射二极管不断发射红外线,红外光电三极管接收反射回来的红外光。由于白色对红外反射强,黑色对红外反射弱,故此可检测黑、白线。
技术参数
- 工作电压:VCC 3.3-5V
- 检测范围:1-3cm
- 模块尺寸:24x46x7.5mm
引脚定义
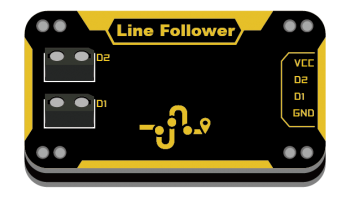
| VCC | 电源 |
| D2 | D2红外接收触发值 |
| D1 | D1红外接收触发值 |
| GND | 地 |
使用教程
1、在安装循迹模块时约距离循迹线1CM左右;
2、循迹线的宽度至少15mm;
3、可用黑色电工胶带DIY循迹线,效果较好。
掌控板及mPython编程
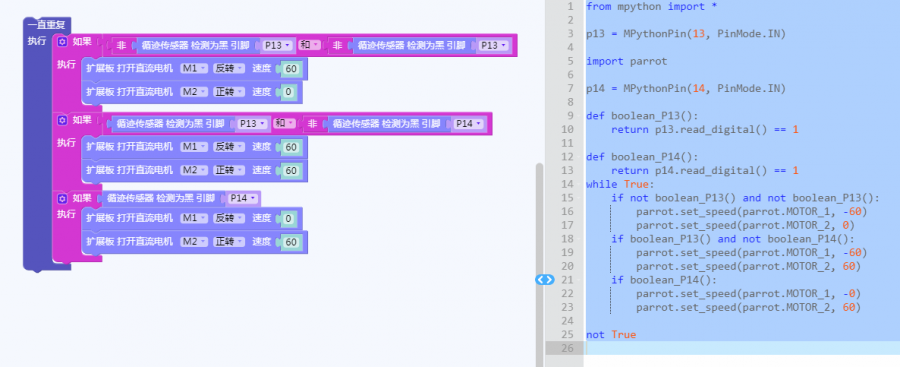
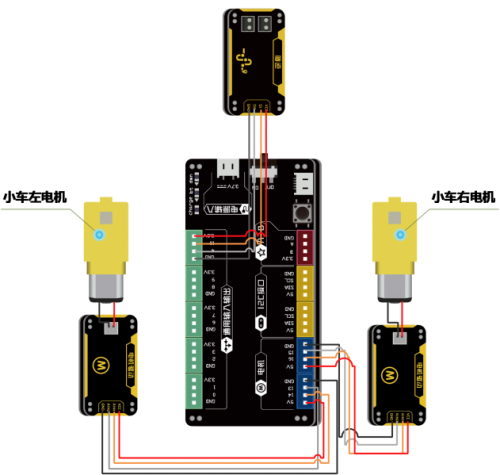
#程序功能:用循迹传感器加上2个电机,制作一个循迹小车。
| 连接示意图 |
| 图形化及mPython代码 |
Bluebit主控
//程序功能:根据循迹传感器两个红外对管的不同状态,控制两个电机的状态//
//红外对管1  红外对管2  电机1  电机2//
//    1          1      不转   不转 //
//    1          0      不转   转   //
//    0          1      转     不转 //
//    0          0      转     转   //
from microbit import *

D1 = None
D2 = None

def digitalRead(pin):
  pin.read_digital()
  pin.set_pull(pin.NO_PULL)
  return pin.read_digital()


while True:
  D1 = digitalRead(pin10)
  D2 = digitalRead(pin4)
  if D1 == 1 and D2 == 0:
    pin14.write_analog(1)
    sleep(2)
    pin13.write_analog(1)
    sleep(2)
    pin16.write_analog(500)
    sleep(2)
    pin15.write_analog(1)
    sleep(2)
  elif D1 == 0 and D2 == 1:
    pin16.write_analog(1)
    sleep(2)
    pin15.write_analog(1)
    sleep(2)
    pin13.write_analog(500)
    sleep(2)
    pin14.write_analog(1)
    sleep(2)
  else:
    pin13.write_analog(500)
    sleep(2)
    pin14.write_analog(1)
    sleep(2)
    pin16.write_analog(500)
    sleep(2)
    pin15.write_analog(1)
    sleep(2)
图形化示例
| 连接如下图所示: |
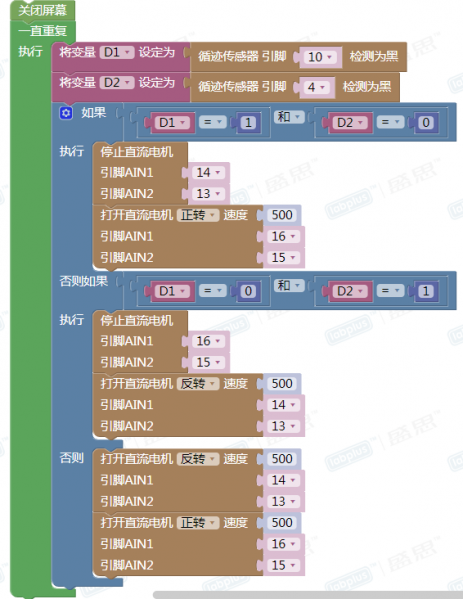
| 程序功能:小车按照路线行驶 |
版本历史记录
| Version | Date | Note [+]新增[-]删除[^]修复 |
|---|---|---|
| V2.0 | 2018/08/09 | [^]英文丝印;D1、D2交换 |


