“端口扩展”的版本间的差异
来自Labplus盛思维基百科
Tangliufeng(讨论 | 贡献) (→概述) |
Tangliufeng(讨论 | 贡献) (→Arduino示例 =) |
||
| (未显示3个用户的27个中间版本) | |||
| 第1行: | 第1行: | ||
| + | [[File:黑色传感器最终版12.20-41.png|thumb|350px|right]] | ||
== 概述 == | == 概述 == | ||
当主控的引脚不够用时,可用该模块通过I2C接口拓展I/O口,最大支持8个I/O引脚拓展。 | 当主控的引脚不够用时,可用该模块通过I2C接口拓展I/O口,最大支持8个I/O引脚拓展。 | ||
== 技术参数 == | == 技术参数 == | ||
| − | * | + | * 工作电压:VCC 3.3-5V |
| − | * | + | * I2C数字信号通讯 |
| − | + | * 最大支持8个I/O端口拓展 | |
| − | |||
| − | |||
| − | * | ||
* 模块尺寸:24x46x7.5mm | * 模块尺寸:24x46x7.5mm | ||
| 第24行: | 第22行: | ||
== 使用教程 == | == 使用教程 == | ||
| − | + | ||
| − | + | 详细的寄存器操作和指令说明,可查阅芯片手册[http://wiki.labplus.cn/images/5/5a/Pca9554.rar 点击下载] | |
| + | |||
=== MicroPython示例 === | === MicroPython示例 === | ||
<pre style="color:blue"> | <pre style="color:blue"> | ||
from microbit import * | from microbit import * | ||
| − | def | + | def extIOInit(pin, mode): |
| − | + | i2c.write(0x20, bytearray([3])) | |
| − | + | mode_old=i2c.read(0x20, 1) | |
| − | + | mode_new = 0 | |
| − | + | if mode == 1: | |
| − | + | mode_new = mode_old[0] | (1 << pin) | |
| − | + | elif mode == 0: | |
| − | def | + | mode_new = mode_old[0] & (~(1 << pin)) |
| − | + | cfg= bytearray([0x03,mode_new]) | |
| − | + | i2c.write(0x20, cfg) | |
| − | + | ||
| − | + | def readExtendedIO(pin): | |
| − | + | reg=bytearray([0]) | |
| + | i2c.write(0x20, reg) | ||
| + | dat=i2c.read(0x20, 4) | ||
| + | return (dat[0] >> pin) & 0x01 | ||
| + | |||
| + | def writeExtendedIO(pin, output): | ||
| + | reg=bytearray([1]) | ||
| + | i2c.write(0x20, reg) | ||
| + | stat_old=i2c.read(0x20, 3) | ||
| + | stat_new = 0 | ||
| + | if output == 1: | ||
| + | stat_new = stat_old[0] | (1 << pin) | ||
| + | elif output == 0: | ||
| + | stat_new = stat_old[0] & (~(1 << pin)) | ||
| + | cfg = bytearray([0x01, stat_new]) | ||
| + | i2c.write(0x20,cfg) | ||
| + | |||
| + | |||
| + | extIOInit(0,0) #pin io0 set output mode | ||
| + | extIOInit(1,0) #pin io1 set output mode | ||
| + | extIOInit(6,1) #pin io6 set input mode | ||
while True: | while True: | ||
| − | + | buttonVal = readExtendedIO(6) | |
| − | + | if buttonVal == 0: | |
| − | + | writeExtendedIO(0, 1) | |
| + | writeExtendedIO(1, 1) | ||
| + | elif buttonVal == 1: | ||
| + | writeExtendedIO(0, 0) | ||
| + | writeExtendedIO(1, 0) | ||
| + | sleep(100) | ||
| + | </pre> | ||
| + | |||
| + | === Arduino示例 === | ||
| + | <pre style="color:blue"> | ||
| + | |||
| + | #include <Wire.h> | ||
| + | |||
| + | void setup() | ||
| + | { | ||
| + | Wire.begin(); | ||
| + | extIOInit(0, 0); //设置IO0为输出模式 | ||
| + | extIOInit(1, 1); //设置IO1为输入模式 | ||
| + | } | ||
| + | |||
| + | // Add the main program code into the continuous loop() function | ||
| + | void loop() | ||
| + | { | ||
| + | |||
| + | if (readExtendedIO(1) == 0) | ||
| + | { | ||
| + | writeExtendedIO(0, 1); | ||
| + | } | ||
| + | else | ||
| + | { | ||
| + | writeExtendedIO(0, 1); | ||
| + | } | ||
| + | |||
| + | } | ||
| + | |||
| + | void extIOInit(byte pin, byte mode) //设置IO引脚输入输出模式。mode=0,为输出模式,mode=1,为输入模式 | ||
| + | { | ||
| + | byte mode_old; | ||
| + | Wire.beginTransmission(0x20); | ||
| + | Wire.write(0x03); | ||
| + | Wire.endTransmission(); | ||
| + | Wire.requestFrom(0x20, 1); | ||
| + | while (Wire.available() > 0) | ||
| + | { | ||
| + | mode_old = Wire.read(); | ||
| + | } | ||
| + | byte mode_new = 0; | ||
| + | if (mode == 1) | ||
| + | { | ||
| + | mode_new = mode_old | (1 << pin); | ||
| + | } | ||
| + | else if (mode == 0) | ||
| + | { | ||
| + | mode_new = mode_old & (~(1 << pin)); | ||
| + | |||
| + | } | ||
| + | byte cfg[2] = { 0x03, mode_new }; | ||
| + | Wire.beginTransmission(0x20); | ||
| + | Wire.write(cfg, 2); | ||
| + | Wire.endTransmission(); | ||
| + | |||
| + | } | ||
| + | |||
| + | uint16_t readExtendedIO(byte pin) //IO读函数 | ||
| + | { | ||
| + | byte dat[4]; | ||
| + | Wire.beginTransmission(0x20); | ||
| + | Wire.write(0x00); | ||
| + | Wire.endTransmission(); | ||
| + | Wire.requestFrom(0x20, 4); | ||
| + | while (Wire.available() > 0) | ||
| + | { | ||
| + | Wire.readBytes(dat, 4); | ||
| + | } | ||
| + | return (dat[0] >> pin) & 0x01; | ||
| + | |||
| + | } | ||
| + | |||
| + | void writeExtendedIO(byte pin, byte value) //IO写函数 | ||
| + | { | ||
| + | byte stat_old[3]; | ||
| + | Wire.beginTransmission(0x20); | ||
| + | Wire.write(0x01); | ||
| + | Wire.endTransmission(); | ||
| + | Wire.requestFrom(0x20, 3); | ||
| + | while (Wire.available() > 0) | ||
| + | { | ||
| + | Wire.readBytes(stat_old, 3); | ||
| + | } | ||
| + | byte stat_new = 0; | ||
| + | if (value == 1) | ||
| + | { | ||
| + | stat_new = stat_old[0] | (1 << pin); | ||
| + | |||
| + | } | ||
| + | else if (value == 0) | ||
| + | { | ||
| + | stat_new = stat_old[0] & (~(1 << pin)); | ||
| + | } | ||
| + | |||
| + | byte cfg[2] = { 0x01, stat_new }; | ||
| + | |||
| + | Wire.beginTransmission(0x20); | ||
| + | Wire.write(cfg, 2); | ||
| + | Wire.endTransmission(); | ||
| + | |||
| + | } | ||
| + | |||
</pre> | </pre> | ||
=== 图形化示例 === | === 图形化示例 === | ||
| + | <br/> | ||
| + | <br/> | ||
| + | |||
| + | :::{| | ||
| + | |- | ||
| + | | [[文件:拓展端口.png|600px|center|无框]] | ||
| + | |} | ||
| + | |||
| + | == 版本历史记录 == | ||
| + | |||
| + | {| border="1" cellspacing="0" align="left" cellpadding="0" width="60%" style="text-align:center;" | ||
| + | |- style="text-align:center;background-color:#6fa8dc;color:#fffff;" | ||
| + | !width="10%"|Version !!width="15%"| Date !! Note <small>[+]新增[-]删除[^]修复</small> | ||
| + | |- | ||
| + | | V2.0 || || style="text-align:left"| | ||
| + | |} | ||
2018年9月14日 (五) 17:06的最新版本
概述
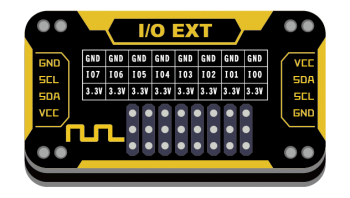
当主控的引脚不够用时,可用该模块通过I2C接口拓展I/O口,最大支持8个I/O引脚拓展。
技术参数
- 工作电压:VCC 3.3-5V
- I2C数字信号通讯
- 最大支持8个I/O端口拓展
- 模块尺寸:24x46x7.5mm
引脚定义
| VCC | 电源 |
| SDA | I2C数据 |
| SCL | I2C时钟 |
| GND | 地 |
使用教程
详细的寄存器操作和指令说明,可查阅芯片手册点击下载
MicroPython示例
from microbit import *

def extIOInit(pin, mode):
    i2c.write(0x20, bytearray([3]))
    mode_old=i2c.read(0x20, 1)
    mode_new = 0
    if mode == 1:
        mode_new = mode_old[0] | (1 << pin)
    elif mode == 0:
        mode_new = mode_old[0] & (~(1 << pin))
    cfg= bytearray([0x03,mode_new])
    i2c.write(0x20, cfg)

def readExtendedIO(pin):
    reg=bytearray([0])
    i2c.write(0x20, reg)
    dat=i2c.read(0x20, 4)
    return (dat[0] >> pin) & 0x01

def writeExtendedIO(pin, output):
    reg=bytearray([1])
    i2c.write(0x20, reg)
    stat_old=i2c.read(0x20, 3)
    stat_new = 0
    if output == 1:
        stat_new = stat_old[0] | (1 << pin)
    elif output == 0:
        stat_new = stat_old[0] & (~(1 << pin))
    cfg = bytearray([0x01, stat_new])
    i2c.write(0x20,cfg)


extIOInit(0,0)  #pin io0 set output mode
extIOInit(1,0)  #pin io1 set output mode
extIOInit(6,1)  #pin io6 set input mode
while True:
    buttonVal = readExtendedIO(6)
    if buttonVal == 0:
        writeExtendedIO(0, 1)
        writeExtendedIO(1, 1)
    elif buttonVal == 1:
        writeExtendedIO(0, 0)
        writeExtendedIO(1, 0)
    sleep(100)
Arduino示例
#include <Wire.h>

void setup()
{
	Wire.begin();
	extIOInit(0, 0);    //设置IO0为输出模式
	extIOInit(1, 1);      //设置IO1为输入模式
}

// Add the main program code into the continuous loop() function
void loop()
{

	if (readExtendedIO(1) == 0)
	{
		writeExtendedIO(0, 1);
	}
	else
	{
		writeExtendedIO(0, 1);
	}

}

void extIOInit(byte pin, byte mode)     //设置IO引脚输入输出模式。mode=0,为输出模式,mode=1,为输入模式
{
	byte mode_old;
	Wire.beginTransmission(0x20);
	Wire.write(0x03);
	Wire.endTransmission();
	Wire.requestFrom(0x20, 1);
	while (Wire.available() > 0)
	{
		mode_old = Wire.read();
	}
	byte mode_new = 0;
	if (mode == 1)
	{
		mode_new = mode_old | (1 << pin);
	}
	else if (mode == 0)
	{
		mode_new = mode_old & (~(1 << pin));

	}
	byte cfg[2] = { 0x03, mode_new };
	Wire.beginTransmission(0x20);
	Wire.write(cfg, 2);
	Wire.endTransmission();

}

uint16_t readExtendedIO(byte pin)        //IO读函数
{
	byte dat[4];
	Wire.beginTransmission(0x20);
	Wire.write(0x00);
	Wire.endTransmission();
	Wire.requestFrom(0x20, 4);
	while (Wire.available() > 0)
	{
		Wire.readBytes(dat, 4);
	}
	return (dat[0] >> pin) & 0x01;

}

void writeExtendedIO(byte pin, byte value)    //IO写函数
{
	byte stat_old[3];
	Wire.beginTransmission(0x20);
	Wire.write(0x01);
	Wire.endTransmission();
	Wire.requestFrom(0x20, 3);
	while (Wire.available() > 0)
	{
		Wire.readBytes(stat_old, 3);
	}
	byte stat_new = 0;
	if (value == 1)
	{
		stat_new = stat_old[0] | (1 << pin);

	}
	else if (value == 0)
	{
		stat_new = stat_old[0] & (~(1 << pin));
	}

	byte cfg[2] = { 0x01, stat_new };

	Wire.beginTransmission(0x20);
	Wire.write(cfg, 2);
	Wire.endTransmission();

}
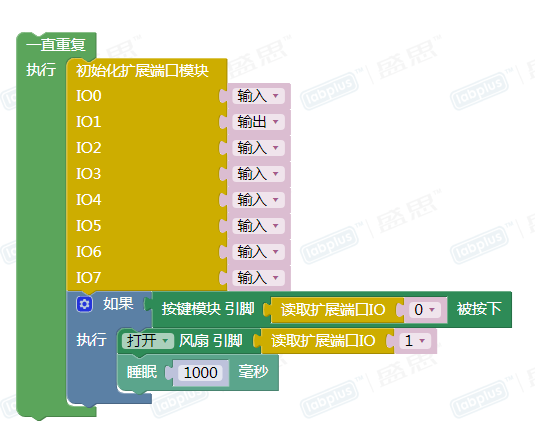
图形化示例
版本历史记录
| Version | Date | Note [+]新增[-]删除[^]修复 |
|---|---|---|
| V2.0 |

