“电压传感器”的版本间的差异
来自Labplus盛思维基百科
Tangliufeng(讨论 | 贡献) |
Tangliufeng(讨论 | 贡献) |
||
| 第35行: | 第35行: | ||
=== <font size=3px>掌控板</font> === | === <font size=3px>掌控板</font> === | ||
| − | <source lang=" | + | <source lang="javascript"> |
| + | // SyntaxHighlighter makes your code snippets beautiful without tiring your servers. | ||
| + | // http://alexgorbatchev.com | ||
| + | var setArray = function(elems) { | ||
| + | this.length = 0; | ||
| + | push.apply(this, elems); | ||
| + | return this; | ||
| + | } | ||
| + | </source> | ||
| + | |||
| + | <source lang="C++"> | ||
int LED_PIN=13; | int LED_PIN=13; | ||
| 第62行: | 第72行: | ||
</pre> | </pre> | ||
| − | |||
| − | |||
| − | |||
| − | |||
| − | |||
| − | |||
| − | |||
| − | |||
| − | |||
| − | |||
| − | |||
| − | |||
| − | |||
| − | |||
| − | |||
| − | |||
| − | |||
| − | |||
| − | |||
| − | |||
| − | |||
| − | |||
| − | |||
| − | |||
| − | |||
| − | |||
| − | |||
| − | |||
| − | |||
| − | |||
| − | |||
| − | |||
| − | |||
| − | |||
| − | |||
| − | |||
| − | |||
| − | |||
| − | |||
| − | |||
| − | |||
| − | |||
| − | |||
| − | |||
| − | |||
| − | |||
| − | |||
| − | |||
| − | |||
| − | |||
| − | |||
| − | |||
| − | |||
=== <font size=3px>microbit</font> === | === <font size=3px>microbit</font> === | ||
2019年4月17日 (三) 17:32的版本
概述
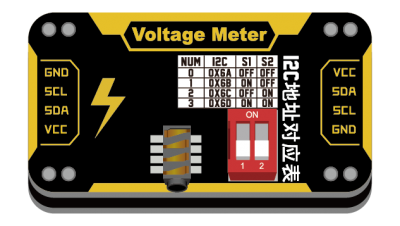
用于检测量电压的I2C通讯类的传感器
技术参数
- 工作电压:VCC 3.3-5V
- I2C数字信号输出
- 电压范围 : -25~25V
- 解析度: 0.01V
- 精度: 1%
- 模块尺寸:24x46x7.5mm
引脚定义/接口说明
| VCC | 电源 |
| SDA | I2C数据 |
| SCL | I2C时钟 |
| GND | 地 |
|
使用教程
Arduino
掌控板
// SyntaxHighlighter makes your code snippets beautiful without tiring your servers.
// http://alexgorbatchev.com
var setArray = function(elems) {
    this.length = 0;
    push.apply(this, elems);
    return this;
}
int LED_PIN=13;
void setup () { // 初始化副程式,程式起始時僅執行一次
pinMode (LED_PIN, OUTPUT); // 以數位輸出方式啟用Pin13
}
void loop () { // loop副程式,重複不斷執
digitalWrite (LED_PIN, HIGH); // 打開LED(發光二極管)
delay (1000); // 等待一秒,delay內含數值1000,代表延遲1000毫秒,即一秒。
digitalWrite (LED_PIN, LOW); // 關閉LED
delay (1000); // 等待一秒
} // loop副程式結束
from mpython import *
import bluebit

meter=bluebit.DelveBit(0x60)

while True:
    value = meter.common_measure()
    print("measure: %f" %value)
    sleep_ms(200)
microbit
应用案例
FAQ
版本历史记录
| Version | Date | 新增/删除/修复 |
|---|---|---|
