“Car:bit”的版本间的差异
来自Labplus盛思维基百科
Tangliufeng(讨论 | 贡献) |
小 (Senadmin移动页面Private:Car:bit至Car:bit覆盖重定向) |
(没有差异)
| |
2018年5月8日 (二) 11:07的版本
概述
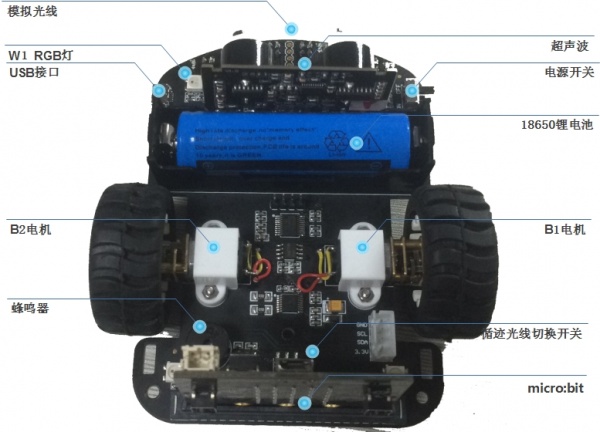
car:bit是以micro:bit作主控的小车。内置超声波、模拟光线、蜂鸣器、测速、全彩RGB灯、循迹等模块。可用于超声波测距、循线、寻光、无线遥控小车。
技术参数
- 供电方式:3.7V 18650锂电池
- Micro USB接口:可充电
- PCI插槽,可接入micro:bit作为主控
- 内置模拟光线
- 超声波测距 3cm~300cm 精度±1cm
- 支持两轮测速
使用说明
- car:bit快速入门
Step1.教程:microbit怎么编程下载?
Step2.在使用电机驱动函数和测速函数时,应在先程序前定义car:bit驱动
Step3.简要使用说明
| car:bit | micro:bit引脚 | Python示例 |
|---|---|---|
| B2电机 | I2C | setLeftMotor(value) 前进 value:0~100;后退 value:0~-100 |
| B1电机 | I2C | setRightMotor(value) 前进 value:0~100;后退 value:0~-100 |
| 蜂鸣器 | P0 | import music music.play(music.NYAN) |
| W1/W2/W3/W4 RGB灯 | P8 | #W1显示红色 import neopixel np=neopixel.NeoPixel(pin8,4) np[0]= (255,0,0) np.show() |
| 模拟光线 Q3 | P1 | pin1.read_analog() |
| 模拟光线 Q4 | P2 | pin2.read_analog() |
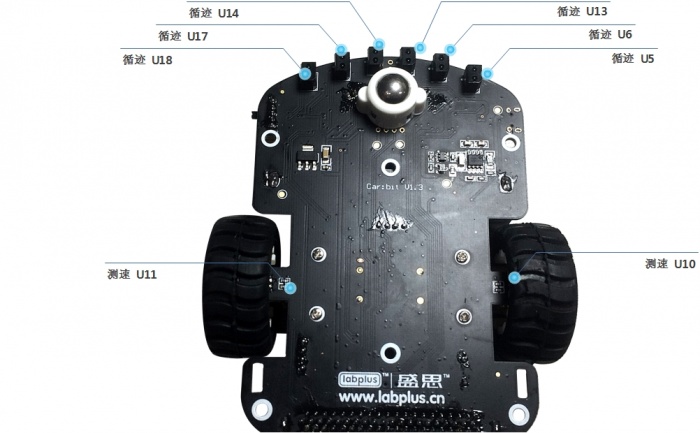
| 测速 U11 | I2C | spd = getSpeed() print(spd[0]+spd[1]*256) #left Speed |
| 测速 U10 | I2C | spd = getSpeed() print(spd[2]+spd[3]*256) #Right Speed |
| 循迹红外对管 U18/U17/U14/U13/U6/U5 | U18->P16 U17->P15 U14->P2 U13->P1 U6->P14 U5->P13 |
pin1.read_digital() 更详细循迹编程可参考循迹例程 |
| 超声波 | I2C | Distance() |
| 1.P1/P2与模拟光线引脚有复用,所以不能同时使用。在使用时需要通过切换开关,选择「循迹」和「光线」 2.如果18650锂电池重新装载的话,第一次需要激活下锂电池才能供电正常!激活方式:装上18650电池后接上microUSB接口,电源开关拨到ON |
应用例程
循迹小车
'''
循迹小车(基于PID算法)
    使用时需调整以下参数
	1、PID参数kp ki kd
	2、直线行走速度值(影响行走速度) k_speed
	3、最大限速值(影向转弯效果) speedMax
	4、速度调整系数(影响转弯速度) speedScale
	5、转弯调整延时(影向转弯调整时间) turnDelay
'''

from microbit import *
kp = 1
ki = 1
kd = 1
preError = 0
integral = 0
delays = 1
leftMotorSpeed = 0
rightMotorSpeed = 0
k_speed = 50
speedMax = 75
turnDelay = 10

def setLeftMotor(speed):
    i2c.write(0x10, bytearray([0x01, speed]))

def setRightMotor(speed):
    i2c.write(0x10, bytearray([0x02, speed]))

def getSpeed():
    motorSpeed = i2c.read(0x10,4)
    return motorSpeed

def pidInit(kp_ = 0, ki_ = 0, kd_  = 0,delays_ = 1):
    global kp, ki,kd, delays
    kp = kp_
    ki = ki_
    kd = kd_
    delays = delays_

def getError():
    err = 0
    varLeft1 = pin1.read_digital()
    varLeft2 = pin14.read_digital()
    varLeft3 = pin13.read_digital()
    varRight1 = pin2.read_digital()
    varRight2 = pin15.read_digital()
    varRight3 = pin16.read_digital()
    if (varLeft1 == 1 and varRight1 == 0 and varLeft2 == 0):
        err = 1
    elif (varLeft2 == 1 and varLeft1 == 1):
        err = 2
    elif (varLeft2 == 1 and varLeft1 == 0 and varLeft3 == 0):
        err = 3
    elif (varLeft3 == 1 and varLeft2 == 1):
        err = 4
    elif (varLeft3 == 1 and varLeft2 == 0):
        err = 5
    elif (varRight1 == 1 and varLeft1 == 0 and varRight2 == 0):
        err = -1
    elif (varRight1 == 1 and varRight2 == 1):
        err = -2
    elif (varRight2 == 1 and varRight1 == 0 and varRight3 == 0):
        err = -3
    elif (varRight3 == 1 and varRight2 == 1):
        err = -4
    elif (varRight3 == 1 and varRight2 == 0):
        err = -5
    #print(err)
    return err

def pidControl():
    global preError,integral,delays,leftMotorSpeed,rightMotorSpeed
    global kd, ki, kd

    speedScale = 1
    error = getError()
    if (error != 0):
        speedScale = 2/abs(error)
        if speedScale > 1:
            speedScale = 1
    integral = integral + error
    derivative = error - preError
    output = (int)(kp*error + ki*integral*delays + kd*derivative/delays)
    print(output)
    preError = error
    leftMotorSpeed = int((k_speed - output)*speedScale)
    rightMotorSpeed = int((k_speed + output)*speedScale)

    if leftMotorSpeed < -speedMax:
        leftMotorSpeed = -speedMax
    elif leftMotorSpeed > speedMax:
        leftMotorSpeed = speedMax
    if rightMotorSpeed < -speedMax:
        rightMotorSpeed = -speedMax
    elif rightMotorSpeed > speedMax:
        rightMotorSpeed = speedMax
    setLeftMotor(leftMotorSpeed)
    setRightMotor(rightMotorSpeed)

    sleep(abs(error)*turnDelay)

# test code
pidInit(kp_ = 8, ki_ = 0.0, kd_ = 15, delays_ = 1)
#setLeftMotor(60)
#setRightMotor(60)

while True:
    pidControl()
版本历史记录
| Version | Date | Note [+]新增[-]删除[^]修复 |
|---|---|---|
| V1.4 | 2018/04/24 |

