“Bot:bit”的版本间的差异
Tangliufeng(讨论 | 贡献) (→Walk Bot python编程) |
Tangliufeng(讨论 | 贡献) (→循迹机器人) |
||
| (未显示2个用户的45个中间版本) | |||
| 第1行: | 第1行: | ||
[[文件:Cc bot2.jpg|500px|缩略图|右]] | [[文件:Cc bot2.jpg|500px|缩略图|右]] | ||
== 概述 == | == 概述 == | ||
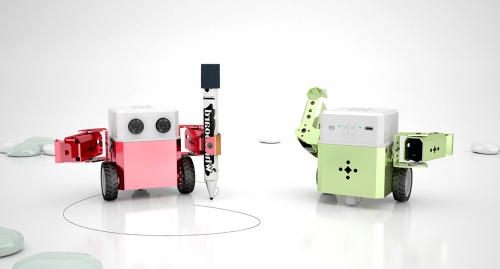
| − | bot: | + | bot:bit人形机器人是一款可以编程控制的人形机器人,支持Mpython图形化编程和Python代码编程,简单易学,通过编程可拓展人的空间思维空间能力。机器人具有多种工作形态,一是装4自由度舵机作为手臂,加上2路电机作为轮子,自由移动的同时双手可灵活操作;二是装有4自由度舵机作为双腿、实现自由行走、避障 |
| + | 循迹。 | ||
| − | == | + | == 技术参数 == |
* 动作灵活:全身拥有8个动作关节,拟人造型,实现动作舞蹈,身手灵活。 | * 动作灵活:全身拥有8个动作关节,拟人造型,实现动作舞蹈,身手灵活。 | ||
| − | * 无线遥控:2. | + | * 无线遥控:2.4GHz射频传输模块和蓝牙模块,可实现遥控格斗运动,欢乐无穷。 |
* 内置加速度计 | * 内置加速度计 | ||
| − | * | + | * 测距避障:内置的高精度超声波模块,能快速返回测量信息、走迷宫、越野的多种任务挑战 |
| − | * | + | * 循迹:采用5对红外收发管 |
| − | + | * 高续航:3节并联14500锂电池,可循环充电,支持课堂教学应用。 | |
| − | + | <br /> | |
| − | + | <br /> | |
{| | {| | ||
| 第25行: | 第26行: | ||
|} | |} | ||
| − | == | + | |
| + | == 引脚定义/接口说明 == | ||
| + | <br /> | ||
| + | |||
| + | {| | ||
| + | |- | ||
| + | | [[File:botbit循迹_define.png|400px]] | ||
| + | |- | ||
| + | | valign="center" align="center"|bot:bit循迹板引脚定义 | ||
| + | |} | ||
| + | <br /> | ||
| + | <br /> | ||
| + | |||
| + | == 使用教程 == | ||
| + | === <font size=4px>结构组装</font> === | ||
| + | <font size=3.5px>bot:bit有以下两种形态,外壳结构部分的组装详见组装说明!</font><br /> | ||
| + | |||
| + | |||
| + | {|style="background-color:#FCF8E3;color:#8A6D3B;" | ||
| + | |- | ||
| + | |style="padding: 2px;"| [[File:warning_yellow.png|25px|center]] ||'''注意:''' | ||
| + | | 在安装舵盘前,请先烧录"组装程序.hex",使舵机角度归零后再按要求按装舵盘! | ||
| + | |} | ||
| + | {|style="background-color:#FCF8E3;color:#8A6D3B;" | ||
| + | |-style="vertical-align:center;" | ||
| + | |[[File:点击下载.png|30px|center]] | ||
| + | |[[:File:Bobit组装程序.rar]] | ||
| + | |} | ||
| + | <br /> | ||
| + | ==== <font size=3px>行走式机器人</font>==== | ||
| + | <font size=3px>4自由度舵机作为双腿、实现自由行走</font> | ||
| + | [[文件:20180109031801!Cc bot1.png|200px|居中|有框|行走式机器人]]<br /> | ||
| + | ==== <font size=3px> 轮式机器人</font>==== | ||
| + | <font size=3px>4自由度舵机作为手臂,加上2路电机作为轮子,自由移动的同时双手可灵活操作</font> | ||
| + | [[文件:Motion bot.jpg|800px|居中|有框|轮式机器人]]<br /> | ||
| + | <br /> | ||
| + | |||
| + | === <font size=4px>连接示意图</font> === | ||
| + | <font size=3px>根据不同bot:bit形态,按示意图将手或脚部的舵机、循迹板、直流电机、电池等连接至主板上</font> | ||
| + | ==== <font size=3px>行走式机器人硬件连接</font>==== | ||
| + | [[文件:Walk bot连接图.jpg|600px|无框|居中]] | ||
| + | <br /><br /> | ||
| + | ====<font size=3px>轮式机器人硬件连接</font>==== | ||
| + | [[文件:Auto bot连接图.jpg|500px|无框|居中]] | ||
| + | |||
| + | |||
| + | ===<font size=4px> 程序下载快速指南</font>=== | ||
{{microbit编程快速入门}} | {{microbit编程快速入门}} | ||
| + | <br /> | ||
| + | <br /> | ||
| + | |||
| + | ===<font size=4px>API 应用程序编程接口</font>=== | ||
| + | |||
| + | {|class="wikitable" | ||
| + | |- | ||
| + | !<font size=3.5>类别</font> !! <font size=3.5>函数名</font> !! <font size=3.5>说明</font> | ||
| + | |- | ||
| + | |rowspan="6" valign="center" align="center"|<font size=4>脚部控制</font> | ||
| + | |<font size=4px>walking(steps,time, direction)</font> | ||
| + | |'''函数功能:'''向前、后行走<br />'''参数:''' | ||
| + | * steps:步数 | ||
| + | * time:单步时间,单位毫秒 | ||
| + | * direction:方向,1为前进,-1为后退 | ||
| + | |- | ||
| + | |<font size=4px>moonwalker(steps,time,h,direction)</font> | ||
| + | |'''函数功能:'''迈克尔杰克逊的太空漫步<br />'''参数:''' | ||
| + | * steps:步数 | ||
| + | * time:单步时间,单位毫秒 | ||
| + | * h:抬脚幅度 | ||
| + | * direction:方向,1为向左,-1为向右 | ||
| + | |- | ||
| + | |<font size=4px>crusaito(steps,time,h,direction)</font> | ||
| + | |'''函数功能:'''滑步<br />'''参数:''' | ||
| + | * steps:步数 | ||
| + | * time:单步时间,单位毫秒 | ||
| + | * h:抬脚幅度 | ||
| + | * direction:方向,1为向左,-1为向右 | ||
| + | |- | ||
| + | |<font size=4px>flapping(steps,time,h,direction)</font> | ||
| + | |'''函数功能:'''八字摇摆<br />'''参数:''' | ||
| + | * steps:步数 | ||
| + | * time:单步时间,单位毫秒 | ||
| + | * h:抬脚幅度 | ||
| + | * direction:方向,1为向前,-1为向后 | ||
| + | |- | ||
| + | |<font size=4px>jump(time)</font> | ||
| + | |'''函数功能:'''跳跃<br />'''参数:''' | ||
| + | * time:单步时间,单位毫秒 | ||
| + | |- | ||
| + | |<font size=4px>turn(steps,time,h,direction)</font> | ||
| + | |'''函数功能:'''向左、右转向<br />'''参数:''' | ||
| + | * steps:步数 | ||
| + | * time:单步时间,单位毫秒 | ||
| + | * h:抬脚幅度 | ||
| + | * direction:方向,1为向前,-1为向后 | ||
| + | |- | ||
| + | | valign="center" align="center"|<font size=4>手部/脚部舵机控制</font> | ||
| + | |<font size=4px>setServo(number,angle)</font> | ||
| + | |'''函数功能:'''S1-S4,4路的舵机驱动<br />'''参数:''' | ||
| + | * number:控制舵机序号0~3,对应S1-S4 | ||
| + | * angle:舵机角度,范围-45°~45° | ||
| + | {|style="background-color:#FCF8E3;color:#8A6D3B;" | ||
| + | |- | ||
| + | |style="padding: 2px;"| [[File:warning_yellow.png|25px|center]] ||'''注意''' | ||
| + | | | ||
| + | * 在使用setServo()设置完舵机角度要,需要使用updatePosition()执行舵机! | ||
| + | * 在控制手部和脚部的舵机时,需要了解对应舵机的驱动编号,具体详见机器人硬件连接图! | ||
| + | |} | ||
| + | <br /> | ||
| + | |- | ||
| + | | valign="center" align="center"|<font size=4>音乐播放</font> | ||
| + | |<font size=4px>music.play(music)</font> | ||
| + | |'''函数功能:'''播放曲目<br />'''参数:''' | ||
| + | * music:microbit内置曲目,如music.BA_DING、music.NYAN、 | ||
| + | :music.BIRTHDAY等 <br/> | ||
| + | [详细的microbit曲目和更多的Music用法,请查阅 [https://microbit-micropython.readthedocs.io/en/latest/tutorials/music.html BBC micro:bit MicroPython Music ] | ||
| + | |- | ||
| + | | valign="center" align="center"|<font size=4>轮子控制</font> | ||
| + | |<font size=4px>motion(leftSpeed, rightSpeed)</font> | ||
| + | |'''函数功能:'''轮式机器人两轮的控制<br />'''参数:''' | ||
| + | * leftSpeed:左轮速度控制,范围-2000~2000;<br/>当为负数时后退,正数时前进,数字越大转速越大; | ||
| + | * rightSpeed:右轮速度控制,范围-2000~2000;<br/>当为负数时后退,正数时前进,数字越大转速越大; | ||
| + | |- | ||
| + | | valign="center" align="center"|<font size=4>超声波</font> | ||
| + | |<font size=4px>distance()</font> | ||
| + | |'''函数功能:'''返回超声波测距<br /> | ||
| + | |- | ||
| + | | rowspan="2" valign="center" align="center"|<font size=4>RGB灯控制</font> | ||
| + | |<font size=4px>setRGB(cmd,r,g,b)</font> | ||
| + | |'''函数功能:'''控制RGB灯(RGB颜色模型)<br />'''参数:''' | ||
| + | * cmd:左灯:2,右灯:3 | ||
| + | * r,g,b:范围0~255 | ||
| + | |- | ||
| + | |<font size=4px>setHSV(cmd,h,s,v)</font> | ||
| + | |'''函数功能:'''控制RGB灯(HSV颜色模型)<br />'''参数:''' | ||
| + | * cmd:左灯:4,右灯:5 | ||
| + | * h,s,v:色调(h)取值范围0~360,饱和度(s)取值范围0~1,明度(v)取值范围0~1 | ||
| + | |- | ||
| + | | valign="center" align="center"|<font size=4>循迹</font> | ||
| + | |<font size=4px>PIDtracking(kp,kd,trackSpeed)</font> | ||
| + | |'''函数功能:'''PID算法循迹<br />'''参数:''' | ||
| + | * kp:PID算法中的P比例控制 | ||
| + | * kd:PID算法中的D微分控制 | ||
| + | * trackSpeed:范围0~2000 | ||
| + | {|style="background-color:#FCF8E3;color:#8A6D3B;" <br/> | ||
| + | |- | ||
| + | |具体的应用可详见下文的循迹示例! | ||
| + | |} | ||
| + | |} | ||
| + | <br /> | ||
| + | <br /> | ||
| + | <br /> | ||
| − | == | + | ==应用示例== |
| − | === | + | ===<font size=4px> 行走式Python编程示例</font>=== |
| − | + | ====<font size=3px> 跳舞机器人</font>==== | |
| − | |||
| − | === | ||
| − | |||
| − | ==== | ||
| − | |||
<pre style="color:blue"> | <pre style="color:blue"> | ||
from microbit import * | from microbit import * | ||
| 第145行: | 第291行: | ||
servo_position[i] = servo_target[i] | servo_position[i] = servo_target[i] | ||
return | return | ||
| − | def jump( | + | def jump(T): |
up = [0, 0, 45, -45] | up = [0, 0, 45, -45] | ||
moveServos(T, up) | moveServos(T, up) | ||
| 第176行: | 第322行: | ||
</pre> | </pre> | ||
| − | === | + | ===<font size=4px> 轮式机器人Python编程示例</font>=== |
| − | + | ||
| − | + | ==== <font size=3px>遥控轮式机器人</font>==== | |
| − | ==== | + | <font size=3px> 程序说明:需要下载有两个程序,一个是micro:bit作为遥控程序,另一个为bot:bit执行动作程序。micro:bit实时发送xyz加速度数据操控bot:bit轮子行走,按下「A」按键+xyz加速度操控两臂动作。</font> |
| − | + | <br /><br /> | |
| − | + | <font size=3px>* micro:bit遥控程序</font> | |
| − | |||
| − | |||
| − | * micro:bit遥控程序 | ||
<pre style="color:blue"> | <pre style="color:blue"> | ||
from microbit import * | from microbit import * | ||
| 第224行: | 第367行: | ||
</pre> | </pre> | ||
| − | * | + | <br/> |
| + | <br/> | ||
| + | <font size=3px>* 轮式机器人执行程序</font> | ||
<pre style="color:blue"> | <pre style="color:blue"> | ||
# -*- coding: utf-8 -*- | # -*- coding: utf-8 -*- | ||
| 第240行: | 第385行: | ||
motor_pwm.ch4 = M2.B | motor_pwm.ch4 = M2.B | ||
''' | ''' | ||
| + | |||
def motion(leftSpeed, rightSpeed): | def motion(leftSpeed, rightSpeed): | ||
| 第302行: | 第448行: | ||
dis = (temp[0]+temp[1]*256)/10 | dis = (temp[0]+temp[1]*256)/10 | ||
return dis | return dis | ||
| + | |||
# application | # application | ||
| 第329行: | 第476行: | ||
a = msg[6]*256 + msg[7] | a = msg[6]*256 + msg[7] | ||
if a == 0: | if a == 0: | ||
| − | left = int((y + x) | + | left = int((y + x) ) |
| − | right = int((y - x) | + | right = int((y - x)) |
| − | # print('left = ', left) | + | #print('left = ', left) |
| − | # print('right = ', right) | + | #print('right = ', right) |
| − | motion(right, left) | + | motion(-right, -left) |
if (a & 0x03) != 0: | if (a & 0x03) != 0: | ||
motion(0, 0) | motion(0, 0) | ||
| 第343行: | 第490行: | ||
sh = min(max(-45, sh), 45) | sh = min(max(-45, sh), 45) | ||
if (a & 0x01) != 0: | if (a & 0x01) != 0: | ||
| − | setServo(0, sv) | + | setServo(0, -sv) |
| − | setServo( | + | setServo(2, -sh) |
if (a & 0x02) != 0: | if (a & 0x02) != 0: | ||
| − | setServo( | + | setServo(1, sv) |
setServo(3, sh) | setServo(3, sh) | ||
updatePosition() | updatePosition() | ||
</pre> | </pre> | ||
| + | <br/> | ||
| + | ==== <font size=3px>循迹机器人</font>==== | ||
| + | {|style="background-color:#FCF8E3;color:#8A6D3B;" | ||
| + | |- | ||
| + | |style="padding: 2px;"| [[File:warning_yellow.png|25px|center]] ||'''注意''' | ||
| + | |只有V2.1版本机器人才支持循迹功能 | ||
| + | |} | ||
| + | |||
| + | 程序使用说明:打开电源,将机器人放置在循迹黑线的中间位置。上电后,机器人原地逆时针旋转,进行红外循迹的黑白校准。校准完成后,机器人进入循迹模式。 <br/> | ||
| + | <pre style="color:blue"> | ||
| + | # -*- coding: utf-8 -*- | ||
| + | from microbit import * | ||
| + | import music | ||
| + | import math | ||
| + | import radio | ||
| + | |||
| + | motor_pwm = bytearray([8, 0x00, 0x00, 0x00, 0x00, 0x00, 0x00, 0x00, 0x00]) | ||
| + | servo_pos = bytearray([0, 0x05, 0xDC, 0x05, 0xDC, 0x05, 0xDC, 0x05, 0xDC]) | ||
| + | |||
| + | # motion functions | ||
| + | def motion(leftSpeed, rightSpeed): | ||
| + | if leftSpeed > 2000: | ||
| + | leftSpeed = 2000 | ||
| + | if leftSpeed < -2000: | ||
| + | leftSpeed = -2000 | ||
| + | if leftSpeed == 0: | ||
| + | motor_pwm[1] = 0 | ||
| + | motor_pwm[2] = 0 | ||
| + | motor_pwm[3] = 0 | ||
| + | motor_pwm[4] = 0 | ||
| + | if leftSpeed > 0: | ||
| + | motor_pwm[1] = int(leftSpeed / 256) | ||
| + | motor_pwm[2] = int(leftSpeed % 256) | ||
| + | motor_pwm[3] = 0 | ||
| + | motor_pwm[4] = 0 | ||
| + | if leftSpeed < 0: | ||
| + | leftSpeed = -leftSpeed | ||
| + | motor_pwm[1] = 0 | ||
| + | motor_pwm[2] = 0 | ||
| + | motor_pwm[3] = int(leftSpeed / 256) | ||
| + | motor_pwm[4] = int(leftSpeed % 256) | ||
| + | if rightSpeed > 2000: | ||
| + | rightSpeed = 2000 | ||
| + | if rightSpeed < -2000: | ||
| + | rightSpeed = -2000 | ||
| + | if rightSpeed == 0: | ||
| + | motor_pwm[5] = 0 | ||
| + | motor_pwm[6] = 0 | ||
| + | motor_pwm[7] = 0 | ||
| + | motor_pwm[8] = 0 | ||
| + | if rightSpeed > 0: | ||
| + | motor_pwm[5] = 0 | ||
| + | motor_pwm[6] = 0 | ||
| + | motor_pwm[7] = int(rightSpeed / 256) | ||
| + | motor_pwm[8] = int(rightSpeed % 256) | ||
| + | if rightSpeed < 0: | ||
| + | rightSpeed = -rightSpeed | ||
| + | motor_pwm[5] = int(rightSpeed / 256) | ||
| + | motor_pwm[6] = int(rightSpeed % 256) | ||
| + | motor_pwm[7] = 0 | ||
| + | motor_pwm[8] = 0 | ||
| + | i2c.write(0x2A, motor_pwm) | ||
| + | |||
| + | |||
| + | # servo functions | ||
| + | def setServo(servo, angle): | ||
| + | "set the servo angel" | ||
| + | a = (1.5 + angle/90) * 1000 | ||
| + | servo_pos[servo*2 + 1] = int(a / 256) | ||
| + | servo_pos[servo*2 + 2] = int(a % 256) | ||
| + | |||
| + | |||
| + | def updatePosition(): | ||
| + | servo_pos[0] = 0 | ||
| + | try: | ||
| + | i2c.write(0x2A, servo_pos) | ||
| + | except: | ||
| + | print("i2c error") | ||
| + | |||
| + | def BatteryLevel(): | ||
| + | return i2c.read(0x2A, 1)[0] | ||
| + | |||
| + | def distance(): | ||
| + | i2c.write(0x0b, bytearray([1])) | ||
| + | sleep(2) | ||
| + | temp=i2c.read(0x0b,2) | ||
| + | distanceCM=(temp[0]+temp[1]*256)/10 | ||
| + | return distanceCM | ||
| + | |||
| + | def setRGB(cmd,r,g,b): #cmd: 2 leftLed 3: rightLed r,g,b range:0-255 | ||
| + | i2c.write(0x0b,bytearray([cmd,r,g,b])) | ||
| + | sleep(1) | ||
| + | |||
| + | def setHSV(cmd,h,s,v): #cmd: 4 leftLed 5: rightLed h range:0-360 s v range:0-1 | ||
| + | _h1 = h%256 | ||
| + | _h2 = h//256 | ||
| + | _s = int(s*100) | ||
| + | _v = int(v*100) | ||
| + | i2c.write(0x0b,bytearray([cmd,_h1,_h2,_s,_v])) | ||
| + | sleep(1) | ||
| + | |||
| + | sensor_min = [1024, 1024, 1024, 1024, 1024] | ||
| + | sensor_max = [0, 0, 0, 0, 0] | ||
| + | sensor = [0, 0, 0, 0, 0] | ||
| + | sensor_pin = (pin3, pin1, pin10, pin2, pin4) | ||
| + | # calibration | ||
| + | def Calibrate(): | ||
| + | global sensor_min, sensor_max, sensor,sensor_pin | ||
| + | motion(-1000, 1000) | ||
| + | t = running_time() | ||
| + | while (running_time() - t) < 5000: | ||
| + | for i in range(5): | ||
| + | sensor[i] = sensor_pin[i].read_analog() | ||
| + | sensor_min[i] = min(sensor[i], sensor_min[i]) | ||
| + | sensor_max[i] = max(sensor[i], sensor_max[i]) | ||
| + | motion(0, 0) | ||
| + | print("sensors min value:%d,%d,%d,%d,%d" % \ | ||
| + | (sensor_min[0], sensor_min[1], sensor_min[2], sensor_min[3], sensor_min[4])) | ||
| + | print("sensors max value:%d,%d,%d,%d,%d" % \ | ||
| + | (sensor_max[0], sensor_max[1], sensor_max[2], sensor_max[3], sensor_max[4])) | ||
| + | |||
| + | def ReadLineSensor(): | ||
| + | global sensor_min, sensor_max, sensor,sensor_pin | ||
| + | for i in range(5): | ||
| + | sensor[i] = sensor_pin[i].read_analog() | ||
| + | sensor[i] = round((sensor[i] - sensor_min[i]) / (sensor_max[i] - sensor_min[i]) * 1000) | ||
| + | |||
| + | sum = sensor[0] + sensor[1] + sensor[2] + sensor[3] + sensor[4] | ||
| + | if sum <= 0: | ||
| + | return 0 | ||
| + | else: | ||
| + | return (sensor[0] + sensor[1] * 1000 + sensor[2] * 2000 + sensor[3] * 3000 + sensor[4]*4000) / sum | ||
| + | |||
| + | def PIDtracking(kp,kd,trackSpeed): | ||
| + | global pre_line_pos | ||
| + | line_pos = ReadLineSensor() - 2000 | ||
| + | correction = kp * line_pos + kd * (line_pos - pre_line_pos) | ||
| + | pre_line_pos = line_pos | ||
| + | print('correction:',correction) | ||
| + | if correction > 0: | ||
| + | motion(trackSpeed - correction, trackSpeed) | ||
| + | else: | ||
| + | motion(trackSpeed, trackSpeed + correction) | ||
| + | |||
| + | # application | ||
| + | t=0 | ||
| + | display.off() | ||
| + | motion(0, 0) | ||
| + | pin3.read_digital() | ||
| + | pin4.read_digital() | ||
| + | pin10.read_digital() | ||
| + | pin3.set_pull(pin3.NO_PULL) | ||
| + | pin4.set_pull(pin4.NO_PULL) | ||
| + | pin10.set_pull(pin10.NO_PULL) | ||
| + | setServo(0,-45) | ||
| + | setServo(2,-45) | ||
| + | setServo(1,45) | ||
| + | setServo(3,45) | ||
| + | updatePosition() | ||
| + | Calibrate() | ||
| + | #kp = float(input('kp=:')) | ||
| + | #kd = float(input('kd=:')) | ||
| + | pre_line_pos = ReadLineSensor() - 2000 | ||
| + | while True: | ||
| + | for i in range(360): | ||
| + | setHSV(4,i,1.0,1.0) | ||
| + | setHSV(5,i,1.0,1.0) | ||
| + | PIDtracking(1.8,5,1200) | ||
| + | sleep(10) | ||
| + | |||
| + | |||
| + | </pre> | ||
| + | <br/> | ||
| + | |||
| + | == 版本历史记录 == | ||
| + | |||
| + | {| border="1" cellspacing="0" align="left" cellpadding="0" width="60%" style="text-align:center;" | ||
| + | |- style="text-align:center;background-color:#6fa8dc;color:#fffff;" | ||
| + | !width="10%"|Version !!width="15%"| Date !! <small>新增/删除/修复</small> | ||
| + | |- | ||
| + | | V2.1 ||2018/07/07 || style="text-align:left"|增加循迹功能超声波板<br/>增加RGB灯功能和优化超声波电路<br/>由USB串口改为蓝牙串口<br/>锂电池由2节改为3节并联,容量更大 | ||
| + | |- | ||
| + | | V1.2 || || style="text-align:left"| | ||
| + | |} | ||
2018年9月3日 (一) 14:32的最新版本
目录
[隐藏]概述
bot:bit人形机器人是一款可以编程控制的人形机器人,支持Mpython图形化编程和Python代码编程,简单易学,通过编程可拓展人的空间思维空间能力。机器人具有多种工作形态,一是装4自由度舵机作为手臂,加上2路电机作为轮子,自由移动的同时双手可灵活操作;二是装有4自由度舵机作为双腿、实现自由行走、避障 循迹。
技术参数
- 动作灵活:全身拥有8个动作关节,拟人造型,实现动作舞蹈,身手灵活。
- 无线遥控:2.4GHz射频传输模块和蓝牙模块,可实现遥控格斗运动,欢乐无穷。
- 内置加速度计
- 测距避障:内置的高精度超声波模块,能快速返回测量信息、走迷宫、越野的多种任务挑战
- 循迹:采用5对红外收发管
- 高续航:3节并联14500锂电池,可循环充电,支持课堂教学应用。
引脚定义/接口说明

|
| bot:bit循迹板引脚定义 |
使用教程
结构组装
bot:bit有以下两种形态,外壳结构部分的组装详见组装说明!
| 注意: | 在安装舵盘前,请先烧录"组装程序.hex",使舵机角度归零后再按要求按装舵盘! |
| File:Bobit组装程序.rar |
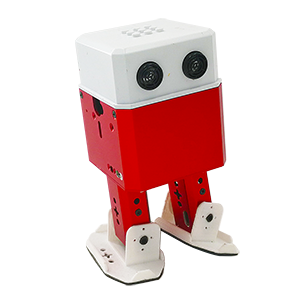
行走式机器人
4自由度舵机作为双腿、实现自由行走
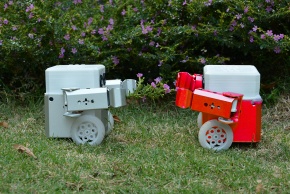
轮式机器人
4自由度舵机作为手臂,加上2路电机作为轮子,自由移动的同时双手可灵活操作
连接示意图
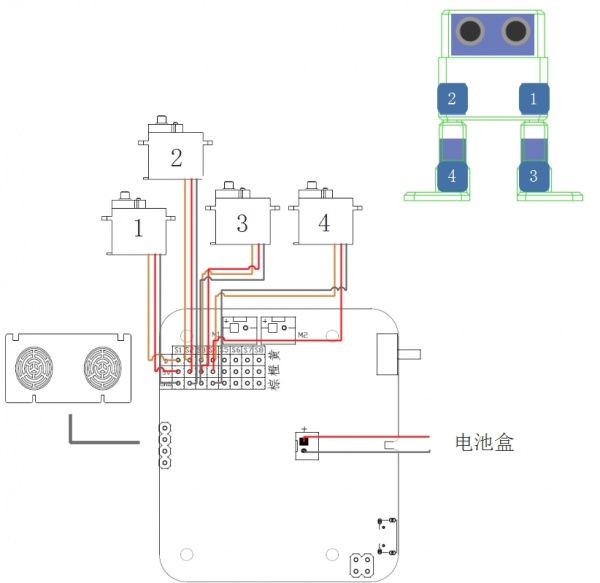
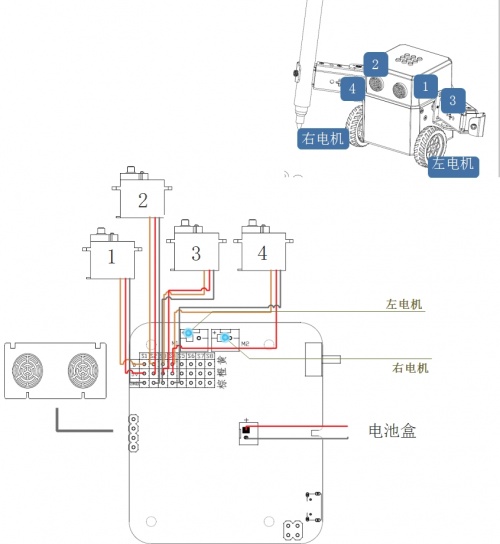
根据不同bot:bit形态,按示意图将手或脚部的舵机、循迹板、直流电机、电池等连接至主板上
行走式机器人硬件连接
轮式机器人硬件连接
程序下载快速指南
Step1.m:python编程软件安装:
双击mpythonSetup.exe按提示安装编程程序。进入官网下载 ( http://labplus.cn/index.php/product/download )
系统要求:windows7/windows8/windows10,32/64位;windows XP。
Step2.Micro:bit 串口驱动安装:双击mbedWinSerial.exe,按提示安装串口驱动。如需要USB串口打印数据须安装该驱动,不需要可跳过此步骤。
- 进入官网下载 ( http://labplus.cn/index.php/product/download )
- 进入官网下载 ( http://labplus.cn/index.php/product/download )
Step3.硬件识别:USB接口连接至电脑,打开电源开关。电脑将自动识别到可移动存储设备MICROBIT。
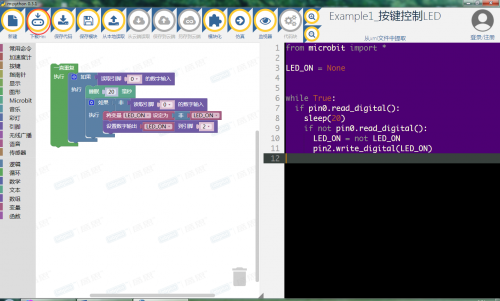
Step4. 程序设计:打开mpython编程软件,根据需要选择图形化编程或python代码编程方式来完成程序。点击软件指令区,选择对应指令进行编程,更方便快速的设计程序。也可点击菜单栏“模块化”,可切换至代码编程。
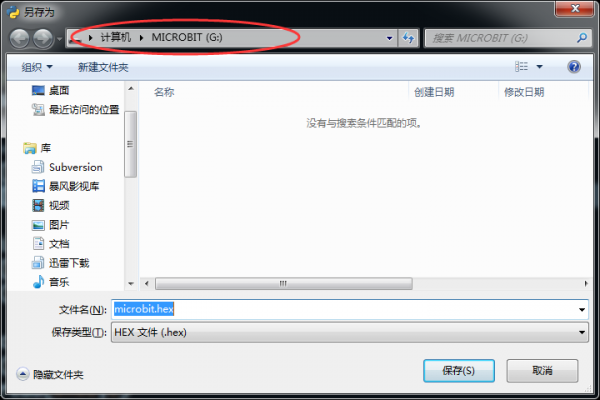
Step5. 程序完成后,点击 ,下载程序并保存到microbit可移动盘上 ,待下载指示灯闪烁完毕后,说明程序下载成功。
更多m:python编程软件操作说明可查看 http://wiki.labplus.cn/index.php?title=Mpython
API 应用程序编程接口
| 类别 | 函数名 | 说明 | |||
|---|---|---|---|---|---|
| 脚部控制 | walking(steps,time, direction) | 函数功能:向前、后行走 参数:
| |||
| moonwalker(steps,time,h,direction) | 函数功能:迈克尔杰克逊的太空漫步 参数:
| ||||
| crusaito(steps,time,h,direction) | 函数功能:滑步 参数:
| ||||
| flapping(steps,time,h,direction) | 函数功能:八字摇摆 参数:
| ||||
| jump(time) | 函数功能:跳跃 参数:
| ||||
| turn(steps,time,h,direction) | 函数功能:向左、右转向 参数:
| ||||
| 手部/脚部舵机控制 | setServo(number,angle) | 函数功能:S1-S4,4路的舵机驱动 参数:
| |||
| 音乐播放 | music.play(music) | 函数功能:播放曲目 参数:
[详细的microbit曲目和更多的Music用法,请查阅 BBC micro:bit MicroPython Music | |||
| 轮子控制 | motion(leftSpeed, rightSpeed) | 函数功能:轮式机器人两轮的控制 参数:
| |||
| 超声波 | distance() | 函数功能:返回超声波测距 | |||
| RGB灯控制 | setRGB(cmd,r,g,b) | 函数功能:控制RGB灯(RGB颜色模型) 参数:
| |||
| setHSV(cmd,h,s,v) | 函数功能:控制RGB灯(HSV颜色模型) 参数:
| ||||
| 循迹 | PIDtracking(kp,kd,trackSpeed) | 函数功能:PID算法循迹 参数:
|
应用示例
行走式Python编程示例
跳舞机器人
from microbit import *
import music
import math
servo_pos = bytearray([0, 0x05, 0xDC, 0x05, 0xDC, 0x05, 0xDC, 0x05, 0xDC])
def setServo(servo, angle):
    "set the servo angel"
    a = (1.5 + angle/90) * 1000
    servo_pos[servo*2 + 1] = int(a / 256)
    servo_pos[servo*2 + 2] = int(a % 256)
def updatePosition():
    servo_pos[0] = 0
    i2c.write(0x2A, servo_pos)
def getDistance():
    i2c.write(0x0b, bytearray([1]))
    temp=i2c.read(0x0B,2)
    dis =(temp[0]+temp[1]*256)/10
    return dis
inc = 0
phase_start=[0, 0, 0, 0]
phase=[0, 0, 0, 0]
offset=[0, 0, 0, 0]
amplitude=[0, 0, 0, 0]
t = 0
def refresh():
    global t, phase, inc, amplitude, phase_start
    if (running_time() - t) > 50:
        t = running_time()
        for i in range(0, 4):
            pos = round(amplitude[i]*math.sin(phase[i] + phase_start[i]) + offset[i])
            setServo(i, pos)
            phase[i] = phase[i] + inc
        updatePosition()
def action(A, O, DIFF, T, steps):
    global inc, amplitude, phase_start, offset
    t2 = 0
    inc = 2*math.pi/(T/50)
    for i in range(0, 4):
        amplitude[i] = A[i]
        phase_start[i] = DIFF[i]
        offset[i] = O[i]
    cycle = int(steps)
    t2 = running_time() + T*cycle
    while (running_time() < t2):
        refresh()
    for i in range(0, 4):
        amplitude[i] = A[i]
        phase_start[i] = DIFF[i]
        offset[i] = O[i]
    # move the servo
    t2 = running_time() + T*(steps - cycle)
    while (running_time() < t2):
        refresh()
def walking(steps, T=1000, dir=1):
    AMP = (30, 30, 20, 20)
    OFFSET = (0, 0, 4, -4)
    DIFF = (0, 0, -math.pi/2 * dir, -math.pi/2 * dir)
    action(AMP, OFFSET, DIFF, T, steps)
    return
def turn(steps, T=2000, dir=1):
    OFFSET = [0, 0, 4, -4]
    DIFF = (0, 0, -math.pi/2 * dir, -math.pi/2 * dir)
    if dir == 1:
        AMP = (30, 10, 20, 20)
    else:
        AMP = (10, 30, 20, 20)
    action(AMP, OFFSET, DIFF, T, steps)
    return
def moonwalker(steps, T=900, h=20, dir=1):
    'Moonwalker. Otto moves like Michael Jackson'
    AMP = [0, 0, h, h]
    OFFSET = [0, 0, h/2 + 2, -h/2 -2]
    DIFF = [0, 0, math.pi/180*dir*-90, math.pi/180*dir*-150]
    action(AMP, OFFSET, DIFF, T, steps)
    return
def crusaito(steps, T, h, dir):
    AMP = [25, 25, h, h]
    OFFSET = [0, 0, h/2+ 4, -h/2 - 4]
    DIFF = [90, 90, 0, math.pi/180*dir*-60]
    action(AMP, OFFSET, DIFF, T, steps)
def flapping(steps, T, h, dir):
    AMP = [12, 12, h, h]
    OFFSET = [0, 0, h-10, -h+10]
    DIFF = [0, math.pi/180*180, math.pi/180*dir*-90, math.pi/180*dir*90]
    action(AMP, OFFSET, DIFF, T, steps)
    return
servo_position = [0, 0, 0, 0]
servo_increment = [0, 0, 0, 0]
def moveServos(time, servo_target):
    if time > 20:
        for i in range(0, 4):
            servo_increment[i] = (servo_target[i] - servo_position[i])/(time/20)
        final_time = running_time() + time;
        iteration = 1
        while running_time() < final_time:
            partial_time = running_time()+20
            for i in range(0, 4):
                setServo(i, servo_position[i]+iteration*servo_increment[i])
            updatePosition()
            while running_time() < partial_time:
                pass
            iteration = iteration+1
    else:
        for i in range(0, 4):
            setServo(i, servo_target[i])
        updatePosition()
    for i in range(0, 4):
        servo_position[i] = servo_target[i]
    return
def jump(T):
    up = [0, 0, 45, -45]
    moveServos(T, up)
    down = [0, 0, 0, 0]
    moveServos(T, down)
    return
def home():
    for i in range(0, 4):
        setServo(i, 0)
        servo_position[i] = 0
    updatePosition()

display.off()
home()
while True:
    walking(5, 1500, 1)
    walking(5, 1500, -1)
    music.play(music.BA_DING)
    moonwalker(5, 1000, 25, 1)
    moonwalker(5, 1000, 25, -1)
    music.play(music.BADDY)
    crusaito(8, 1000, 15, 1)
    crusaito(8, 1000, 15, -1)
    crusaito(4, 2000, 15, 1)
    crusaito(4, 2000, 15, -1)
    music.play(music.NYAN)
    flapping(5, 1500, 15, 1)
    flapping(5, 1500, 15, -1)
    music.play(music.BIRTHDAY)
轮式机器人Python编程示例
遥控轮式机器人
程序说明:需要下载有两个程序,一个是micro:bit作为遥控程序,另一个为bot:bit执行动作程序。micro:bit实时发送xyz加速度数据操控bot:bit轮子行走,按下「A」按键+xyz加速度操控两臂动作。
* micro:bit遥控程序
from microbit import *
import radio
radio.on()
radio.config(length=8, queue=3, channel=79, power=7,
             address=0x44773311, group=0x1B, data_rate=radio.RATE_250KBIT)

msg = bytearray(8)
x = 0
y = 0
z = 0
a = 0
while True:
    x = accelerometer.get_x()
    y = accelerometer.get_y()
    z = accelerometer.get_z()
    if button_a.is_pressed():
        a = a | 0x01
    else:
        a = a & 0xFE
    if button_b.is_pressed():
        a = a | 0x02
    else:
        a = a & 0xFD
    x = x + 10000;
    msg[0] = int(x / 256)
    msg[1] = x % 256
    y = y + 10000;
    msg[2] = int(y / 256)
    msg[3] = y % 256
    z = z + 10000;
    msg[4] = int(z / 256)
    msg[5] = z % 256
    msg[6] = int(a / 256)
    msg[7] = a % 256
    radio.send_bytes(msg)
    sleep(100)
* 轮式机器人执行程序
# -*- coding: utf-8 -*-
from microbit import *
import radio
import math

motor_pwm = bytearray([8, 0x00, 0x00, 0x00, 0x00, 0x00, 0x00, 0x00, 0x00])
servo_pos = bytearray([0, 0x05, 0xDC, 0x05, 0xDC, 0x05, 0xDC, 0x05, 0xDC])

'''
motor_pwm.ch1 = M1.A
motor_pwm.ch2 = M1.B
motor_pwm.ch3 = M2.A
motor_pwm.ch4 = M2.B
'''


def motion(leftSpeed, rightSpeed):
    if leftSpeed > 2000:
        leftSpeed = 2000
    if leftSpeed < -2000:
        leftSpeed = -2000
    if leftSpeed == 0:
        motor_pwm[1] = 0
        motor_pwm[2] = 0
        motor_pwm[3] = 0
        motor_pwm[4] = 0
    if leftSpeed > 0:
        motor_pwm[1] = int(leftSpeed / 256)
        motor_pwm[2] = int(leftSpeed % 256)
        motor_pwm[3] = 0
        motor_pwm[4] = 0
    if leftSpeed < 0:
        leftSpeed = -leftSpeed
        motor_pwm[1] = 0
        motor_pwm[2] = 0
        motor_pwm[3] = int(leftSpeed / 256)
        motor_pwm[4] = int(leftSpeed % 256)
    if rightSpeed > 2000:
        rightSpeed = 2000
    if rightSpeed < -2000:
        rightSpeed = -2000
    if rightSpeed == 0:
        motor_pwm[5] = 0
        motor_pwm[6] = 0
        motor_pwm[7] = 0
        motor_pwm[8] = 0
    if rightSpeed > 0:
        motor_pwm[5] = 0
        motor_pwm[6] = 0
        motor_pwm[7] = int(rightSpeed / 256)
        motor_pwm[8] = int(rightSpeed % 256)
    if rightSpeed < 0:
        rightSpeed = -rightSpeed
        motor_pwm[5] = int(rightSpeed / 256)
        motor_pwm[6] = int(rightSpeed % 256)
        motor_pwm[7] = 0
        motor_pwm[8] = 0
    i2c.write(0x2A, motor_pwm)


def setServo(servo, angle):
    "set the servo angel"
    a = (1.5 + angle/90) * 1000
    servo_pos[servo*2 + 1] = int(a / 256)
    servo_pos[servo*2 + 2] = int(a % 256)


def updatePosition():
    servo_pos[0] = 0
    i2c.write(0x2A, servo_pos)


def getDistance():
    i2c.write(0x0b, bytearray([1]))
    temp = i2c.read(0x0B, 2)
    dis = (temp[0]+temp[1]*256)/10
    return dis


# application
display.off()
motion(0, 0)

radio.on()
radio.config(length=8, queue=20, channel=79, power=7,
             address=0x44773311, group=0x1B, data_rate=radio.RATE_250KBIT)
x = 0
y = 0
z = 0
a = 0
left = 0
right = 0
while True:
    # print("running")
    msg = bytes(8)
    msg = radio.receive_bytes()
    if msg is not None:
        x = msg[0]*256 + msg[1]
        x = x - 10000
        y = msg[2]*256 + msg[3]
        y = y - 10000
        z = msg[4]*256 + msg[5]
        z = z - 10000
        a = msg[6]*256 + msg[7]
        if a == 0:
            left = int((y + x) )
            right = int((y - x))
            #print('left = ', left)
            #print('right = ', right)
            motion(-right, -left)
        if (a & 0x03) != 0:
            motion(0, 0)
            y = min(max(-1000, y), 1000)
            x = min(max(-1000, x), 1000)
            sv = math.asin(y/1000)*180/math.pi
            sh = math.asin(x/1000)*180/math.pi
            sv = min(max(-45, sv), 45)
            sh = min(max(-45, sh), 45)
            if (a & 0x01) != 0:
                setServo(0, -sv)
                setServo(2, -sh)
            if (a & 0x02) != 0:
                setServo(1, sv)
                setServo(3, sh)
            updatePosition()
循迹机器人
| 注意 | 只有V2.1版本机器人才支持循迹功能 |
程序使用说明:打开电源,将机器人放置在循迹黑线的中间位置。上电后,机器人原地逆时针旋转,进行红外循迹的黑白校准。校准完成后,机器人进入循迹模式。
 # -*- coding: utf-8 -*-
from microbit import *
import music
import math
import radio

motor_pwm = bytearray([8, 0x00, 0x00, 0x00, 0x00, 0x00, 0x00, 0x00, 0x00])
servo_pos = bytearray([0, 0x05, 0xDC, 0x05, 0xDC, 0x05, 0xDC, 0x05, 0xDC])

# motion functions
def motion(leftSpeed, rightSpeed):
    if leftSpeed > 2000:
        leftSpeed = 2000
    if leftSpeed < -2000:
        leftSpeed = -2000
    if leftSpeed == 0:
        motor_pwm[1] = 0
        motor_pwm[2] = 0
        motor_pwm[3] = 0
        motor_pwm[4] = 0
    if leftSpeed > 0:
        motor_pwm[1] = int(leftSpeed / 256)
        motor_pwm[2] = int(leftSpeed % 256)
        motor_pwm[3] = 0
        motor_pwm[4] = 0
    if leftSpeed < 0:
        leftSpeed = -leftSpeed
        motor_pwm[1] = 0
        motor_pwm[2] = 0
        motor_pwm[3] = int(leftSpeed / 256)
        motor_pwm[4] = int(leftSpeed % 256)
    if rightSpeed > 2000:
        rightSpeed = 2000
    if rightSpeed < -2000:
        rightSpeed = -2000
    if rightSpeed == 0:
        motor_pwm[5] = 0
        motor_pwm[6] = 0
        motor_pwm[7] = 0
        motor_pwm[8] = 0
    if rightSpeed > 0:
        motor_pwm[5] = 0
        motor_pwm[6] = 0
        motor_pwm[7] = int(rightSpeed / 256)
        motor_pwm[8] = int(rightSpeed % 256)
    if rightSpeed < 0:
        rightSpeed = -rightSpeed
        motor_pwm[5] = int(rightSpeed / 256)
        motor_pwm[6] = int(rightSpeed % 256)
        motor_pwm[7] = 0
        motor_pwm[8] = 0
    i2c.write(0x2A, motor_pwm)


# servo functions
def setServo(servo, angle):
    "set the servo angel"
    a = (1.5 + angle/90) * 1000
    servo_pos[servo*2 + 1] = int(a / 256)
    servo_pos[servo*2 + 2] = int(a % 256)


def updatePosition():
    servo_pos[0] = 0
    try:
        i2c.write(0x2A, servo_pos)
    except:
        print("i2c error")

def BatteryLevel():
    return i2c.read(0x2A, 1)[0]

def distance():
    i2c.write(0x0b, bytearray([1]))
    sleep(2)
    temp=i2c.read(0x0b,2)
    distanceCM=(temp[0]+temp[1]*256)/10
    return distanceCM

def setRGB(cmd,r,g,b): #cmd: 2 leftLed 3: rightLed r,g,b range:0-255
    i2c.write(0x0b,bytearray([cmd,r,g,b]))
    sleep(1)

def setHSV(cmd,h,s,v): #cmd: 4 leftLed 5: rightLed h range:0-360 s v range:0-1
    _h1 = h%256
    _h2 = h//256
    _s = int(s*100)
    _v = int(v*100)
    i2c.write(0x0b,bytearray([cmd,_h1,_h2,_s,_v]))
    sleep(1)

sensor_min = [1024, 1024, 1024, 1024, 1024]
sensor_max = [0, 0, 0, 0, 0]
sensor = [0, 0, 0, 0, 0]
sensor_pin = (pin3, pin1, pin10, pin2, pin4)
# calibration
def Calibrate():
    global sensor_min, sensor_max, sensor,sensor_pin
    motion(-1000, 1000)
    t = running_time()
    while (running_time() - t) < 5000:
        for i in range(5):
            sensor[i] = sensor_pin[i].read_analog()
            sensor_min[i] = min(sensor[i], sensor_min[i])
            sensor_max[i] = max(sensor[i], sensor_max[i])
    motion(0, 0)
    print("sensors min value:%d,%d,%d,%d,%d" % \
         (sensor_min[0], sensor_min[1], sensor_min[2], sensor_min[3], sensor_min[4]))
    print("sensors max value:%d,%d,%d,%d,%d" % \
         (sensor_max[0], sensor_max[1], sensor_max[2], sensor_max[3], sensor_max[4]))

def ReadLineSensor():
    global sensor_min, sensor_max, sensor,sensor_pin
    for i in range(5):
        sensor[i] = sensor_pin[i].read_analog()
        sensor[i] = round((sensor[i] - sensor_min[i]) / (sensor_max[i] - sensor_min[i]) * 1000)

    sum = sensor[0] + sensor[1] + sensor[2] + sensor[3] + sensor[4]
    if sum <= 0:
        return 0
    else:
        return (sensor[0] + sensor[1] * 1000 + sensor[2] * 2000 + sensor[3] * 3000 + sensor[4]*4000) / sum

def PIDtracking(kp,kd,trackSpeed):
    global pre_line_pos
    line_pos = ReadLineSensor() - 2000
    correction = kp * line_pos + kd * (line_pos - pre_line_pos)
    pre_line_pos = line_pos
    print('correction:',correction)
    if correction > 0:
        motion(trackSpeed - correction, trackSpeed)
    else:
        motion(trackSpeed, trackSpeed + correction)

# application
t=0
display.off()
motion(0, 0)
pin3.read_digital()
pin4.read_digital()
pin10.read_digital()
pin3.set_pull(pin3.NO_PULL)
pin4.set_pull(pin4.NO_PULL)
pin10.set_pull(pin10.NO_PULL)
setServo(0,-45)
setServo(2,-45)
setServo(1,45)
setServo(3,45)
updatePosition()
Calibrate()
#kp = float(input('kp=:'))
#kd = float(input('kd=:'))
pre_line_pos = ReadLineSensor() - 2000
while True:
    for i in range(360):
        setHSV(4,i,1.0,1.0)
        setHSV(5,i,1.0,1.0)
        PIDtracking(1.8,5,1200)
        sleep(10)
版本历史记录
| Version | Date | 新增/删除/修复 |
|---|---|---|
| V2.1 | 2018/07/07 | 增加循迹功能超声波板 增加RGB灯功能和优化超声波电路 由USB串口改为蓝牙串口 锂电池由2节改为3节并联,容量更大 |
| V1.2 |
