“电压传感器”的版本间的差异
来自Labplus盛思维基百科
Tangliufeng(讨论 | 贡献) |
|||
| (未显示3个用户的8个中间版本) | |||
| 第7行: | 第7行: | ||
* 工作电压:VCC 3.3-5V | * 工作电压:VCC 3.3-5V | ||
* I2C数字信号输出 | * I2C数字信号输出 | ||
| − | * 电压范围 : - | + | * 电压范围 : -15~15V |
* 解析度: 0.01V | * 解析度: 0.01V | ||
* 精度: 1% | * 精度: 1% | ||
| 第31行: | 第31行: | ||
== 使用教程 == | == 使用教程 == | ||
| − | + | 1、在程序编程中需要注意拨动开关地址和程序中的地址一致!<br /> | |
| + | 2、用4PIN连接线将传感器接入主控I2C接口,将耳机-鳄鱼夹线接入传感器,将红黑鳄鱼夹并联接入被测电路中。 | ||
=== <font size=3px>掌控板</font> === | === <font size=3px>掌控板</font> === | ||
| + | ==== 图形化编程 ==== | ||
| + | {| | ||
| + | |- | ||
| + | | [[文件:电压.png |900px|居中|无框]] | ||
| + | |} | ||
| + | ==== 代码编程 ==== | ||
| + | {{DelveBit_mPython}} | ||
| − | < | + | === <font size=3px>Arduino</font> === |
| − | / | ||
| − | |||
| − | |||
| − | |||
| − | |||
| − | |||
| − | |||
| − | |||
| − | + | {{DelveBit_arduino}} | |
| − | |||
| − | |||
| − | |||
| − | |||
| − | |||
| − | |||
| − | |||
| − | |||
| − | |||
| − | |||
| − | |||
| − | |||
| − | |||
| − | |||
| − | |||
| − | |||
| − | |||
| − | |||
| − | |||
| − | |||
| − | |||
| − | |||
| − | |||
| − | |||
| − | |||
=== <font size=3px>microbit</font> === | === <font size=3px>microbit</font> === | ||
| − | |||
| − | |||
== 应用案例 == | == 应用案例 == | ||
2020年6月30日 (二) 15:33的最新版本
目录
概述
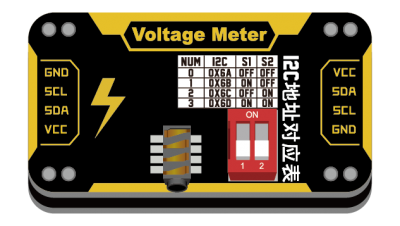
用于检测量电压的I2C通讯类的传感器
技术参数
- 工作电压:VCC 3.3-5V
- I2C数字信号输出
- 电压范围 : -15~15V
- 解析度: 0.01V
- 精度: 1%
- 模块尺寸:24x46x7.5mm
引脚定义/接口说明
| VCC | 电源 |
| SDA | I2C数据 |
| SCL | I2C时钟 |
| GND | 地 |
|
使用教程
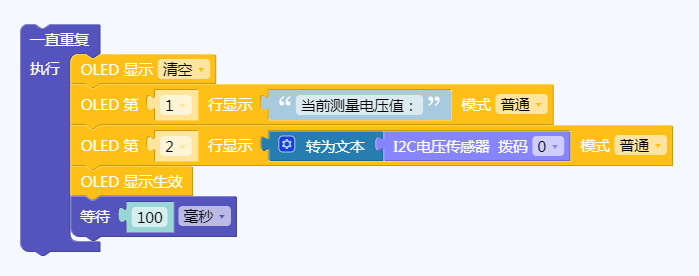
1、在程序编程中需要注意拨动开关地址和程序中的地址一致!
2、用4PIN连接线将传感器接入主控I2C接口,将耳机-鳄鱼夹线接入传感器,将红黑鳄鱼夹并联接入被测电路中。
掌控板
图形化编程
代码编程
- GitHub:bluebit for mPython library
- bluebit for mPython library API: https://mpython-lib.readthedocs.io/zh/master/bluebit/index.html
from mpython import *                   # 导入mpython
import bluebit                          # 导入bluebit 模块

meter=bluebit.DelveBit(0x60)            # 实例模块,根据实际I2C地址修改

while True:
    value = meter.common_measure()      # 测量
    print("measure: %f" %value)
    sleep_ms(200)
Arduino
#include <Wire.h>
int reading = 0;
void GetSensorValue(char address)
{
    Wire.requestFrom(address, 2);
    if (2 <= Wire.available())
    {
       reading = Wire.read();  // receive high byte (overwrites previous reading)
       reading = reading << 8;    // shift high byte to be high 8 bits
       reading |= Wire.read(); // receive low byte as lower 8 bits
       Serial.println(reading);   // print the reading
    }
}

void setup()
{
  Wire.begin();        // join i2c bus (address optional for master)
  Serial.begin(9600);  // start serial for output
}

void loop()
{
   GetSensorValue(0x63);
}
microbit
应用案例
FAQ
版本历史记录
| Version | Date | 新增/删除/修复 |
|---|---|---|

